
|
|
|
page 1 | 2 | 3 | 4 | 5 | 6 | 7
One day, after a short adventure with my toddler son, my Canon SD750 developed an odd dark spot in the middle of the image. It was just bad enough to ruin every photo. At first I was not sure if it was a lens issue or a LCD issue, but the dark spot only showed up on new photos. When I viewed old photos, the camera didn't show a spot, so it was the lens. Zooming in confirmed this. As I zoomed, the spot got darker and had sharper edges. A crack also seemed to appear in the image. Damn. This camera was only about 14 months old, but out of warrantee. Damn. After a quick look for easy fixes online, I bought another camera, the Canon SD790 IS. The SD750 sat on my desk broken and unused. I hatched a plan to sell it either as a portable digital photo frame or as a "haunted" camera, with superimposed images on every shot taken in places which were inhabited by spirits. |
After a few weeks, I happened upon a guy in Morrow, GA selling digital camera parts. He had for sale on ebay the exact lens mechanism that I needed. Bidding started at $20. He was also selling LCDs and other parts. I had no idea if I'd be able to replace the lens mechanism on this camera. The photo he was showing indicated that this lens was deep inside the guts of the camera. This swap would be akin to an engine replacement, not just a tire change. I had no idea what obstacles were in this thing. Luckily, I wasn't counting on this camera anymore. It was effectively a spare. It probably still had a scrap value of $50, and I had invested another $20 in the new lens. I wanted this to work and I figured I had about a 50% chance at fixing the thing. I went for it.
|
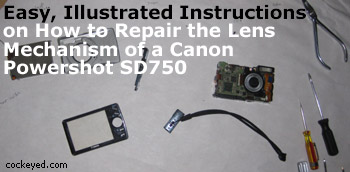
Remove the battery and the memory card. Only about six screws were visible from the outside of the camera. |
I recommend stashing removed screws into a well-labeled ice cube tray. Label the cubicles with a little description on post-it notes, clockwise in the order you removed them. Sometimes I fool myself into thinking that I'll be able to remember where five or six screws go on a project like this, but guess what? Inside there are 25 screws, in three different sizes. That is 19 more than I can remember without some sort of organization system. Next, I removed the two screws on the strap bracket. |
Then the two screws above and below the speaker port.
|
With a little wriggling, the black back plate came free. |
This exposed a single screw holding the LCD screen on. |
Please continue reading page 2 |
Box of See's Candy Costume | Dwight Shrute Bobblehead Costume | American Idol Judges Costume | Sudoku Costume |
Fandango Paper Bag Hand puppet Costume | Doctor Octopus |
Banana Skin Coat | Jenga Costume | California Costume | Silver Wings Costume | Paparazzi Costume | Fish Alien Costume | Cockroach Costume | Africa Costume
contact Rob | science club | pranks |
How much is inside? |
Home |
Incredible Stuff I Made | Torn-up
Credit Card Application
February 6 th, 2009
 These instructions and photos may also assist you in your plan for replacing or repairing the lens mechanism on the Powershot SD1100is, the SD880is, the SD790is, perhaps also the SD770, the SD870is, the SD630, the SD990is or the SD850, the SD870 or the the SD890.


