The Disneyland Costume by Rob Cockerham
Making a Wearable Model of the Disneyland Resort in California
By Rob Cockerham | Originally written November 2013 |
Jump to: Planning, Autopia, Matterhorn, Paper Mache, Painting, Completed Costume, Contests
One of the criteria for a successful halloween costume is being a thing that people LOVE. If you are on stage, showing off to a crowd, the audience is applauding as much for what you represent as they are cheering for your rendering of the costume.
Previous costumes have included a box of See's Candy, a Dwight Shrute Bobblehead, the Money you Could be Saving with Geico and a Fandango Paper Bag Hand Puppet.
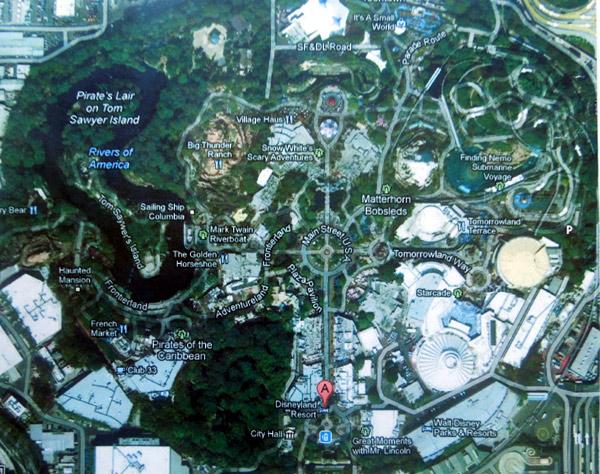
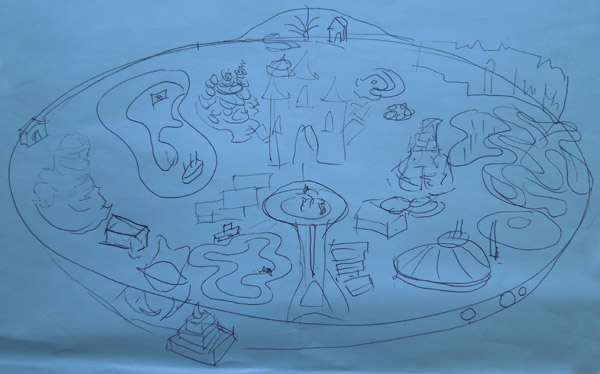
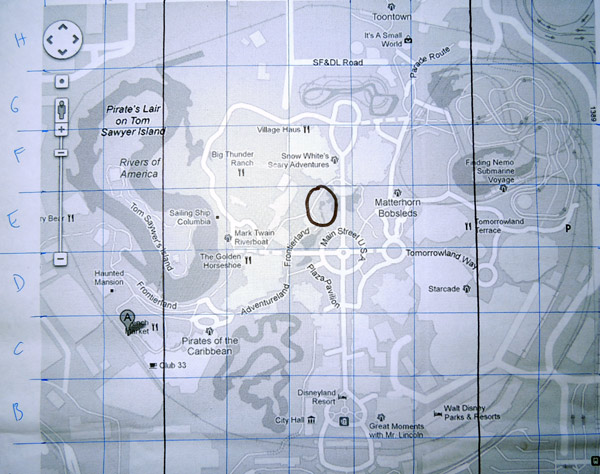
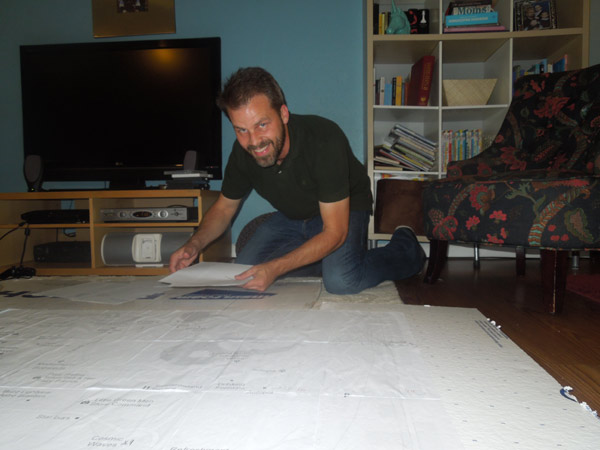
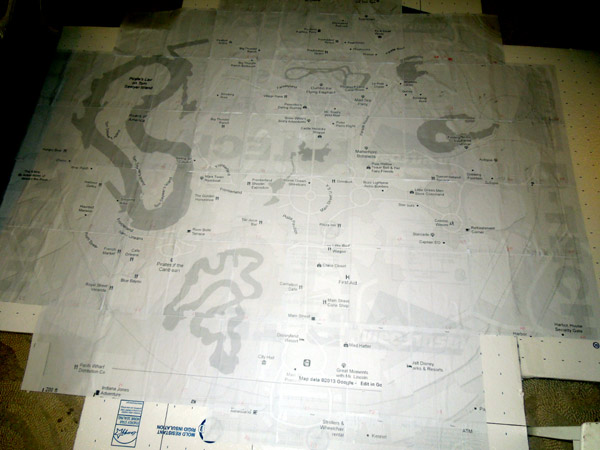
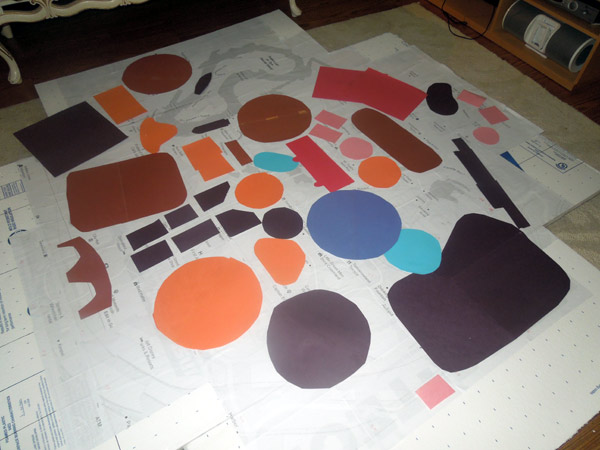
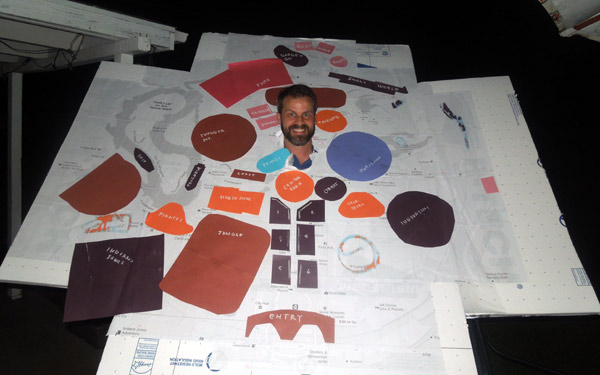
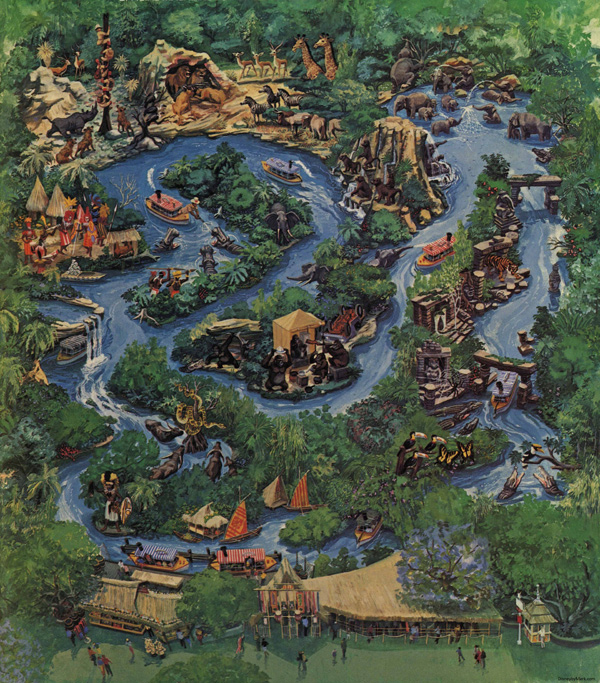
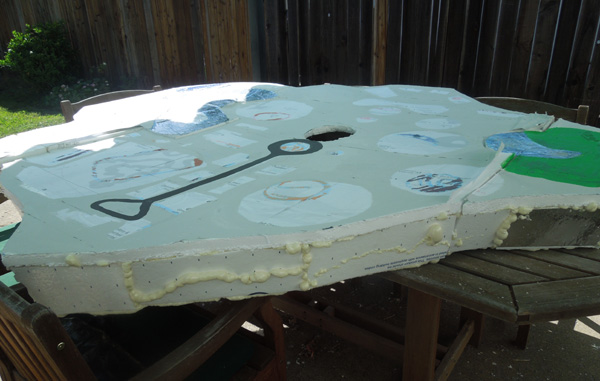
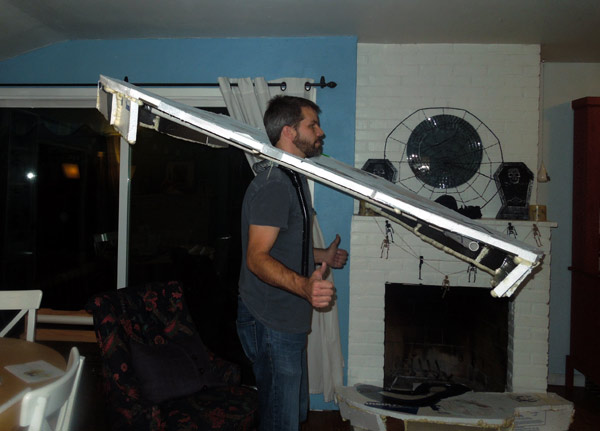
This year I couldn't resist creating a wearable version of something that almost everybody loves: Disneyland. My plan was to wear a map on my shoulders, not parallel to the ground, and not perpendicular to the ground either. I'd wear it at a steep angle, so that kids would have a better view of everything. The first questions were 1) How big should it be, and 2) where will my head go? The default size for my halloween costume is "as big as possible", which is determined by two factors: the size of the SUV I use for transport and 2) the size of the doors I have to get through to get on stage. Any venue with doorways narrower than 31" are out of the question, owing to the size of my ego. I settled on 6'5" as the maximum depth of the main platform. That would allow me to manouver it through regular doorways with relative ease. After considering using the Matterhorn as the central focus of the costume (where my head would go), I accepted that Sleeping Beauty's castle would have to be the center of the costume, and that it would make the most sense as the place where my face and head would occupy the map. Actual satellite maps of Disneyland are somewhat disappointing. There are wide avenues and trees, and plenty of regular buildings and warehouses. I wanted an augmented reality, highlighting the good stuff. But I started with that satellite map, just to get my bearings on the lay of the Disneyland. I used Adobe Fireworks to print out a giant version of the map across 70 sheets of paper. I glued these down in place on a large (6½' x 4') sheet of styrofoam. The sheet wasn't wide enough, so I added two wings to the side to make it about seven and a half feet wide. Next I had to figure out which attractions I would actually create, and how large they could be. What I wanted was a three dimensional map with the important attractions and landmarks built scaled up and almost bumping into one another. I started experimenting with construction paper shapes, almost all of them were oversized. With everything jammed in together, It looked awesome! I couldn't wait to start building tiny versions of Thunder Mountain Railroad or the Jungle Cruise. With the construction paper plan in place, I popped a hole into the styrofoam, just in front of where Sleeping Beauty's castle should be. I would wear her castle as a hat. I have some anxiety that this costume will end up looking like nothing more than a model railroad track on legs. This has me so worried that I might just leave out the perimeter railroad tracks.
The first structure I was interested in was the Jungle Cruise, but I wasn't sure how I was going to pull that off. Fake water is going to look fake, but I hated to admit this at the beginning of the project. Surrounding the water would have to be a dense block of tiny jungle. I could buy one hundred little trees from the model railroad store, but I was still in the planning stage, so I held off for now. I'd figure out how to make a tiny jungle.
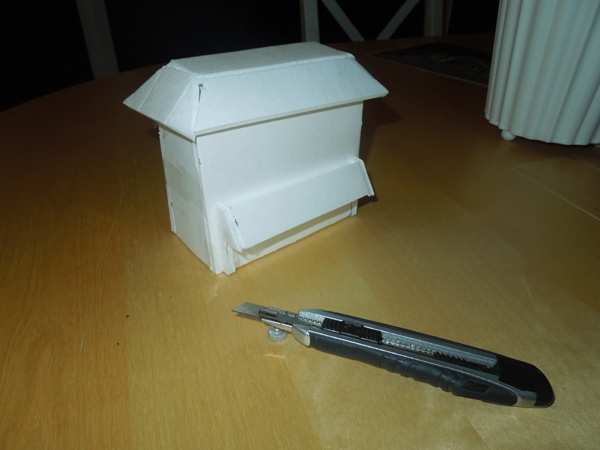
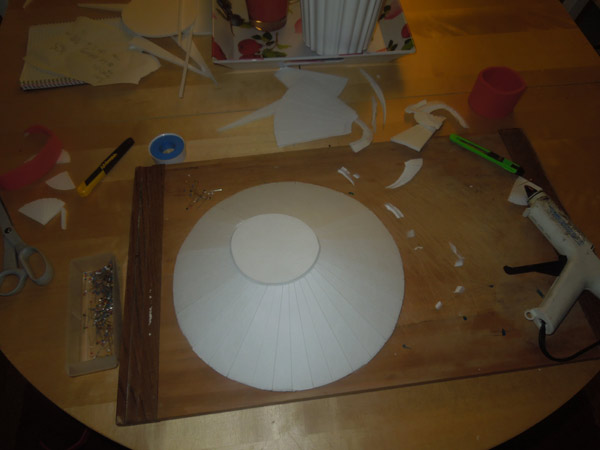
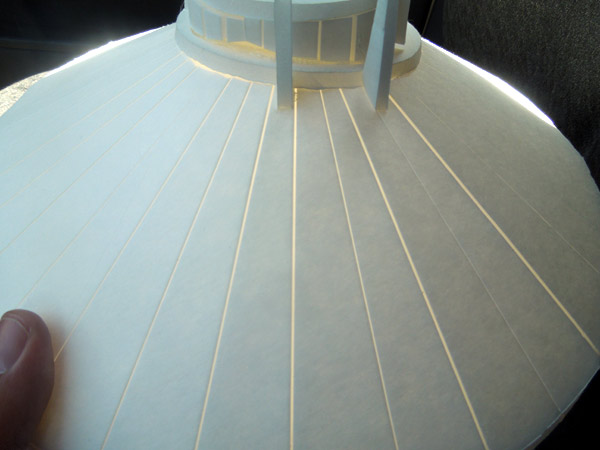
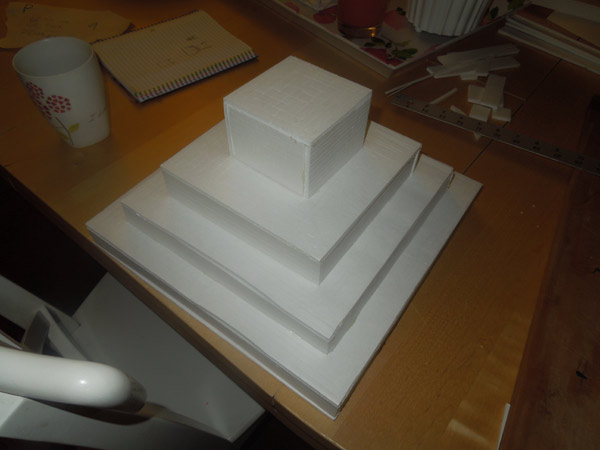
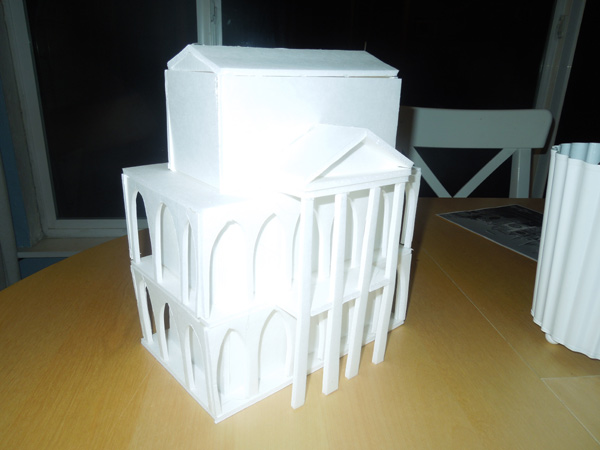
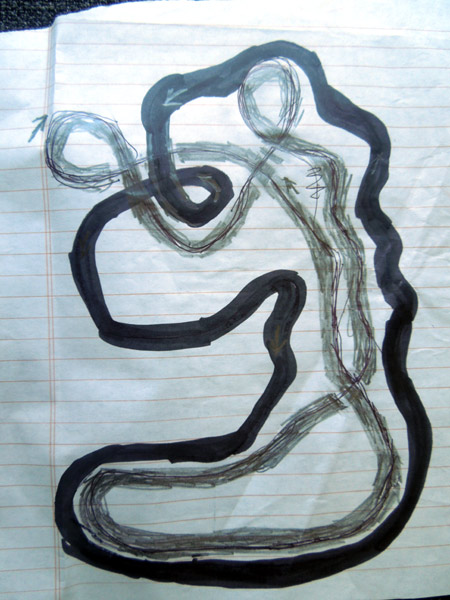
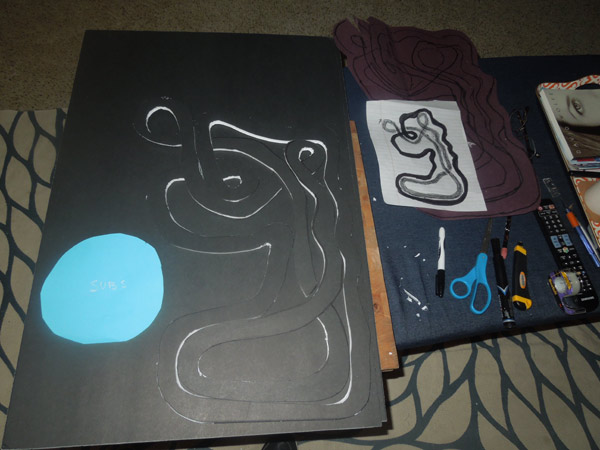
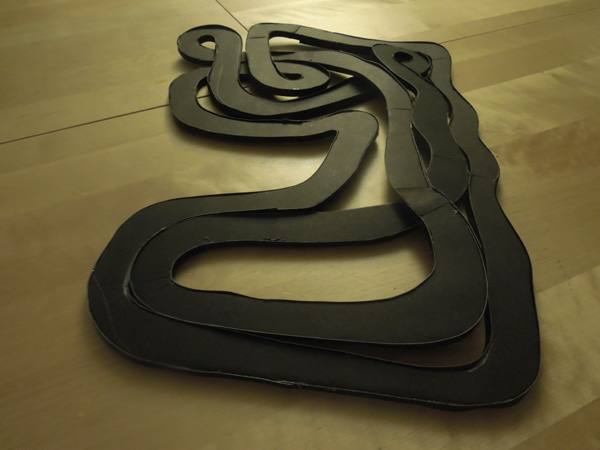
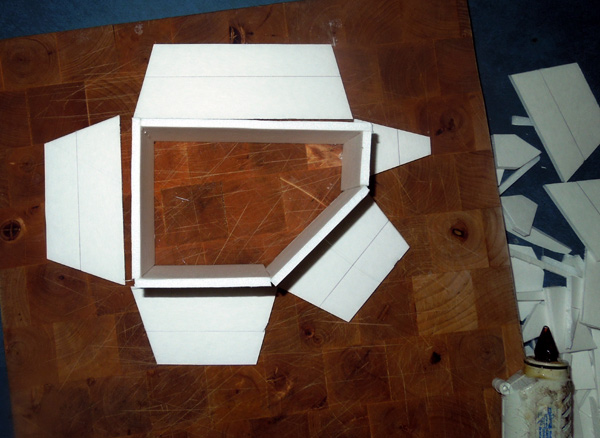
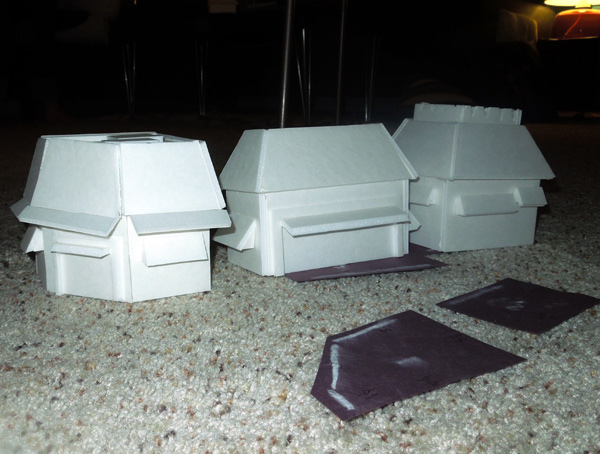
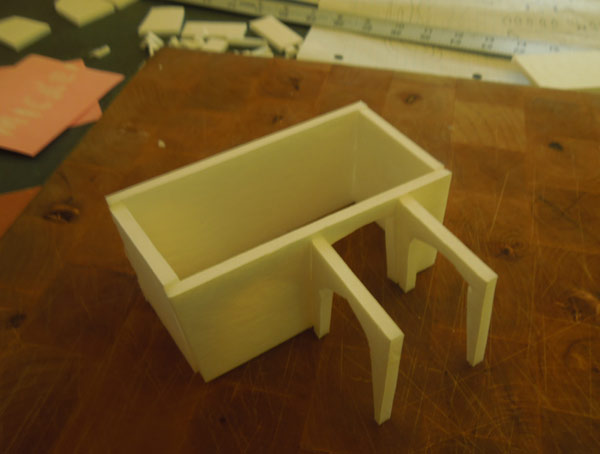
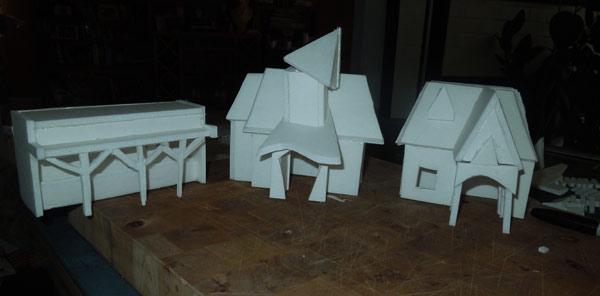
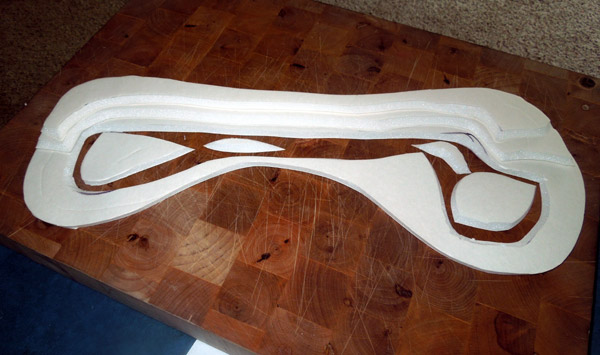
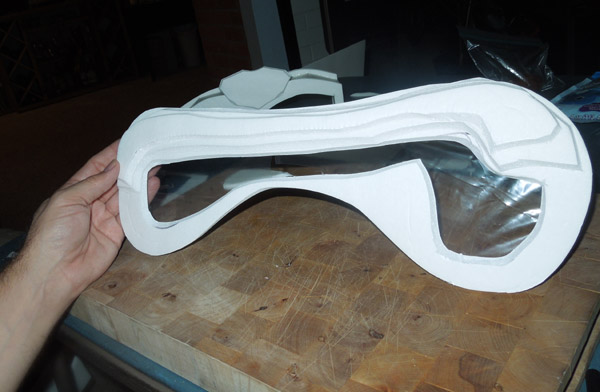
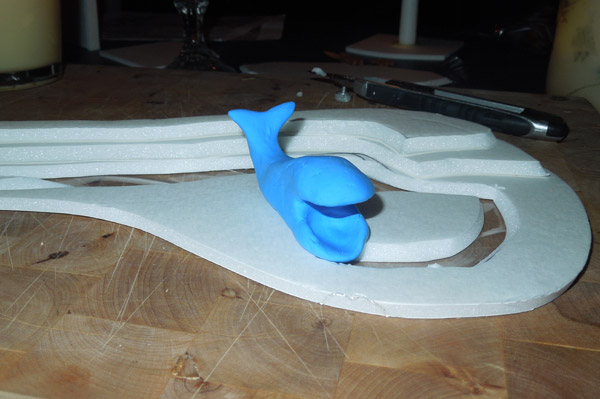
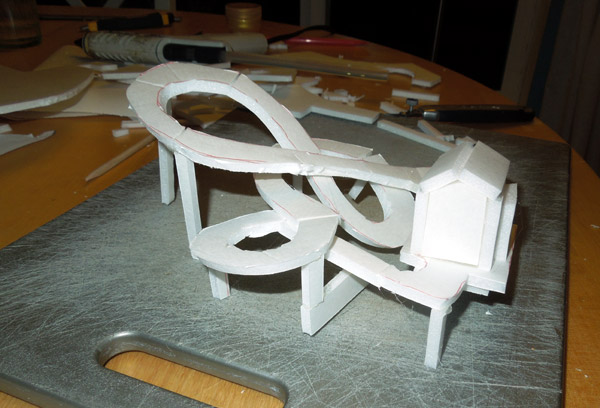
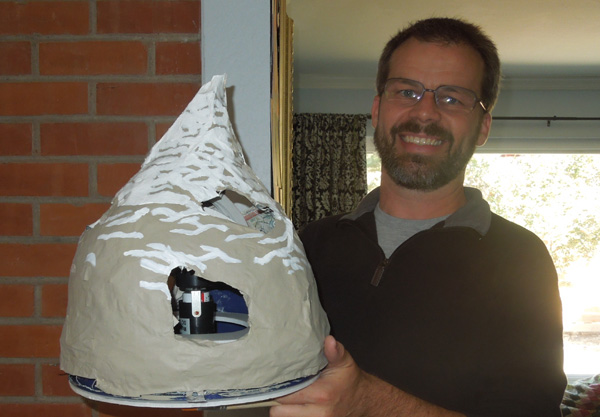
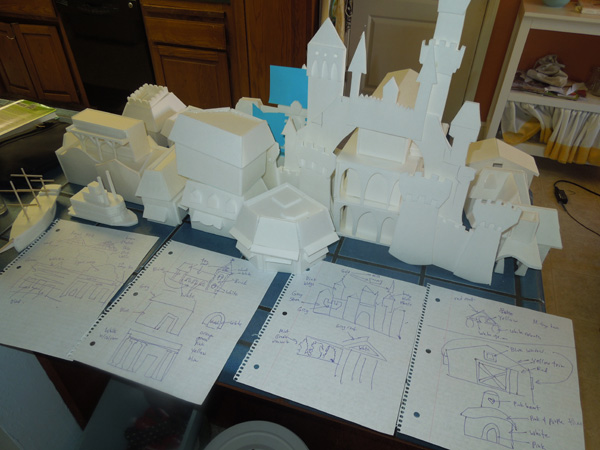
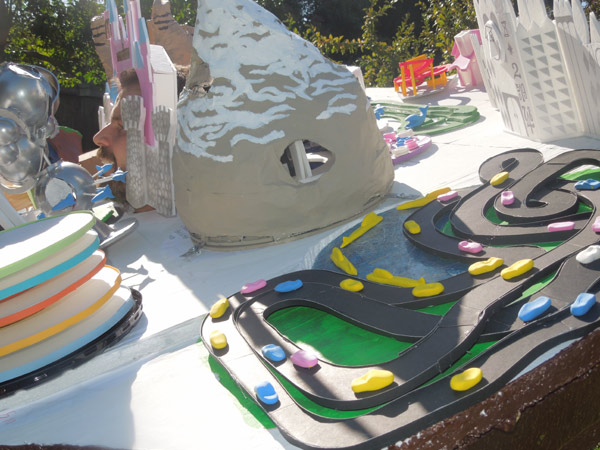
The very first thing I actually began to craft was a simple building. My floorplan specified six separate buildings on a stylized "Main Street USA". I cut walls and a roof out of foam board, to see what kind of scale I would be working with. This is what I came up with. It's tempting to add a bunch of details, but having a consistent level of detail is really important for a project like this one. This was just a practice house. After this first trial, Space Mountain seemed like a good place to start. It's a fully enclosed roller coaster, tucked into a faceted white cone-shaped building. This was a perfect job for white foam board. Making a short cone out of segments required some trials... and errors. Luckily I knew what the base diameter needed to be, and I also had a good idea of the appropriate height. When I finally got the cone right, slicing off the top to add that angled roof section was a bit scary. After that, I added some foam spikey bits and finished with a damn good looking Space Mountain! This was one of the few buildings which wouldn't need to be painted. I wished every building was white, this construction would be a breeze! Next I decided to put together a pyramid for Indiana Jones' Temple of the Forbidden Eye ride. This ride has a hidden entrance within a jungle setting, so the pyramid structure only really exists on the illustrated Disneyland map. Again, I began with the dimensions of the base and figured out how many steps would result in the most appealing ziggurat. It wasn't until after I was finished that I realized the temple was fairly rounded, particularly at the top. If I had enough time, I'd probably re-design this building. The next building was the haunted mansion. This was fairly straightforward plantation style mansion, but I wasn't happy with my ability to render porch areas defined by ornate ironwork. I opted for arched doorways and hoped that this would make the same impression. Obviously this will have to be painted, but I'd put that off until later. Maybe I could learn how to paint by October. Next I wanted to try Autopia's roadway. For this attraction, I brought home some black foamboard and studied the path of the dual Autopian roadways. They are surprisingly complex! I used a sharpie to rough out the accurate road path into a shape which matched my costume's autopia footprint. Then I transferred this shape to foamboard and carefully cut the roadway's shape from it. I also trolled through toy store aisles looking for tiny cars. Two separate manufacturers make very small toy cars which would work at my scale - nano speed cars and nitro micro cars. They were only about a dollar each, but they had too much detail for my project. I waited. Maybe I could find something better in the weeks ahead. With all the foam roadway cut out, and black edging in place, the roadway for Autopia looked awesome. Can you believe the real park roadway follows the precise lines of this woman's face as drawn by Picasso? In Disneyland the Autopia roadway butts up against the lake for the submarine ride. That will be tough to render, but if I could pull it off, this costume could be amazing. I decided years ago that a great costume needs a face, and that face can't be at your waist, or far above your head. It needs to be right at the top of your neck.
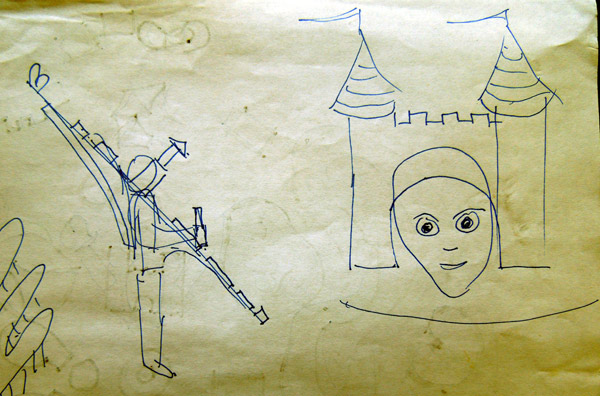
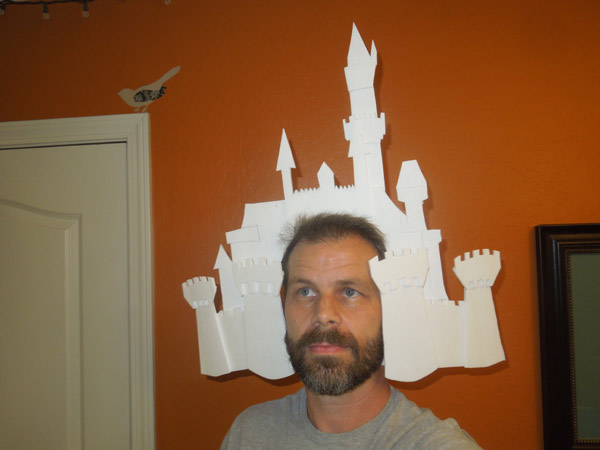
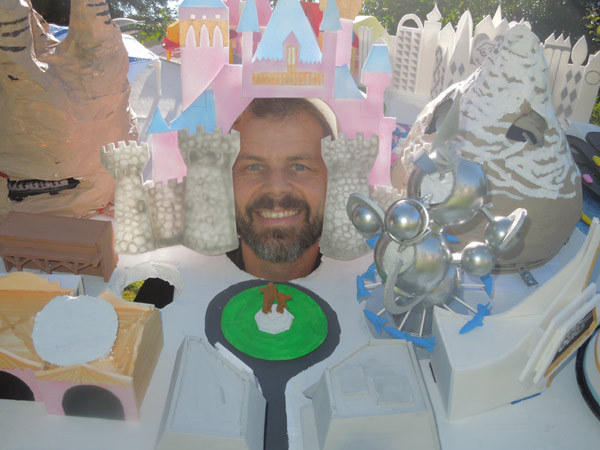
The face for this costume will be tucked inside Sleeping Beauty's castle. One of the contests I like in Sacramento, the at Thunder Valley Casino, specifies that you cannot wear a mask or obscure your face. This design should pass their test. I guess my jaw will be the drawbridge! I won't be able to use foam board for all of the buildings in Disneyland, but it was best for these few. Matterhorn
I wanted my Disneyland to have some moving parts. the railroad, monorail and roller coasters seemed like obvious choices for motorized movement. The railroad seemed impossible. When I worked building displays at the California State Fair, I heard from Richard and Mark that keeping a model railroad working for an extended period on a display was incredibly tricky. Train tracks are like an invitation which says "please mess with this".
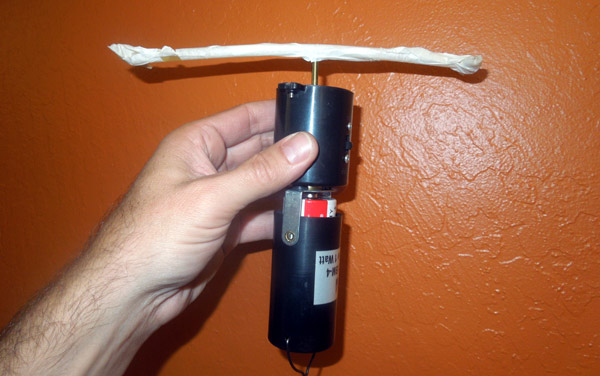
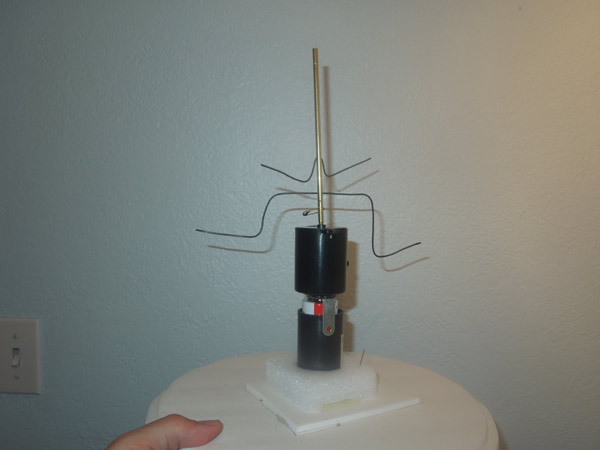
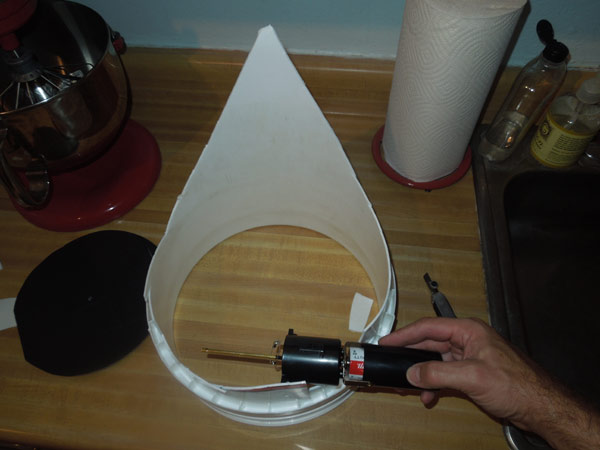
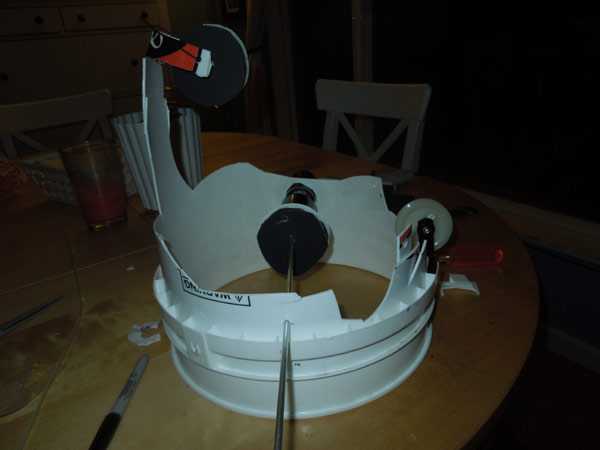
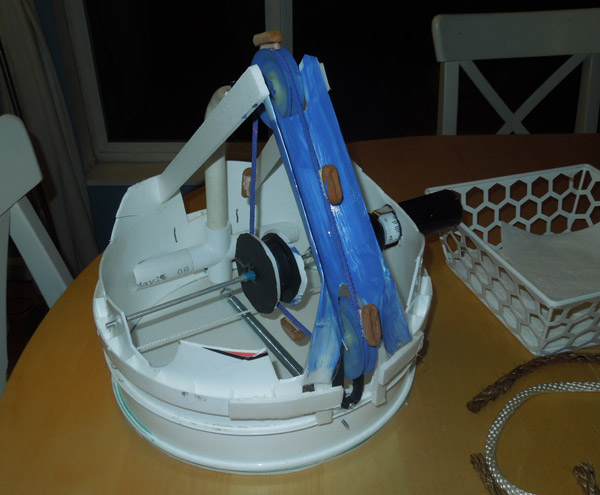
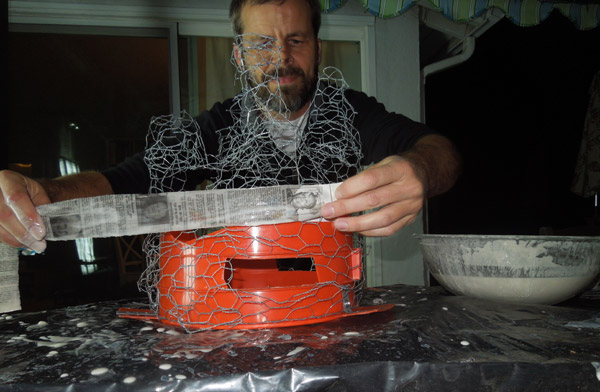
Putting a motor into the Matterhorn seemed more like my speed. First I needed a battery-powered motor which moved very slowly and with a little gusto (torque). These are surprisingly hard to find. Almost all small battery powered motors are fast and weak (low torque). Personal fans, electric toothbrushes, electric cars, etc., all use a fast motor. For my purposes, I needed an easy, dependable way to slow that power down and torque it up with gearing. Luckily, I already had an answer - Disco ball motors. I had seen battery-powered disco ball motors which were built with gearing and accept a D battery. My plan was to get one of these motors, invert it and to have it spin a disk inside the matterhorn mountain. Small windows into the interior would reveal the bobsleds sliding past as they rotated. I bought one disco ball motor from Party City for about 8 bucks. It was a little loud, but was appropriately slow and seemed quite robust. The first order of business was to test if one battery could power it for an entire evening of costume contest fun. I attached a drinking straw to spin like a propellor and left it in the garage to run all night long. I wouldn't mind if the motor slowed down, but if it stopped, I’d have to plan for a battery replacement scheme.
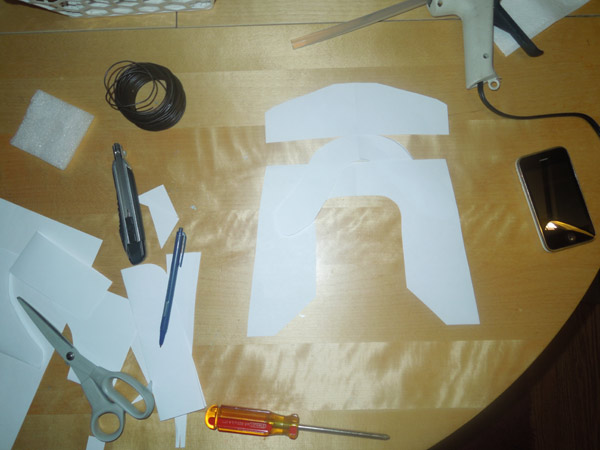
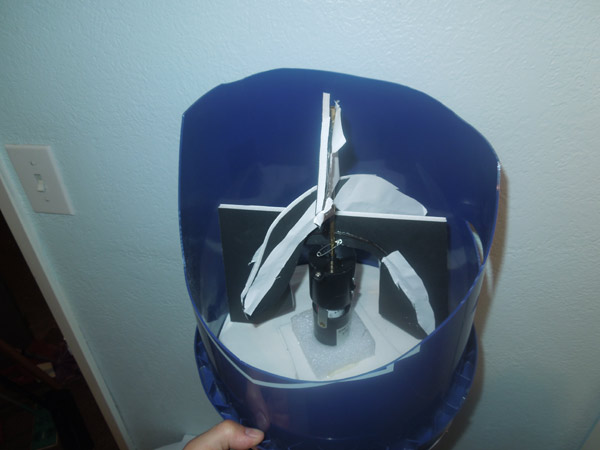
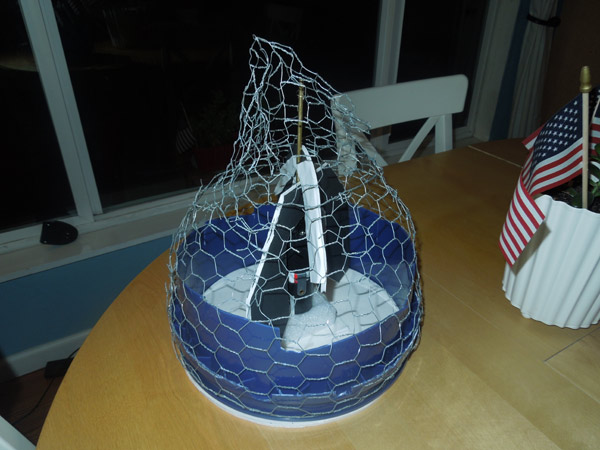
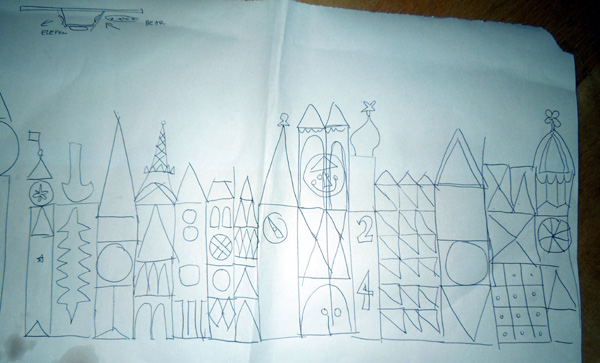
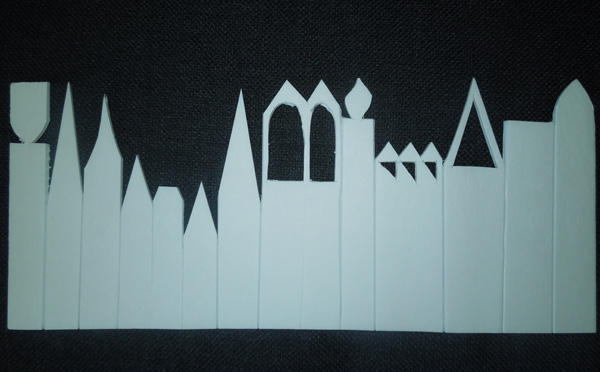
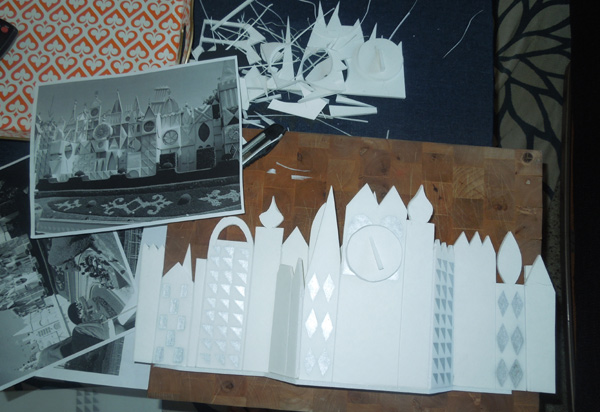
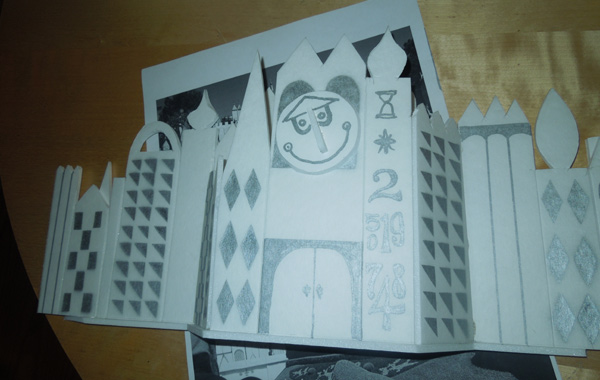
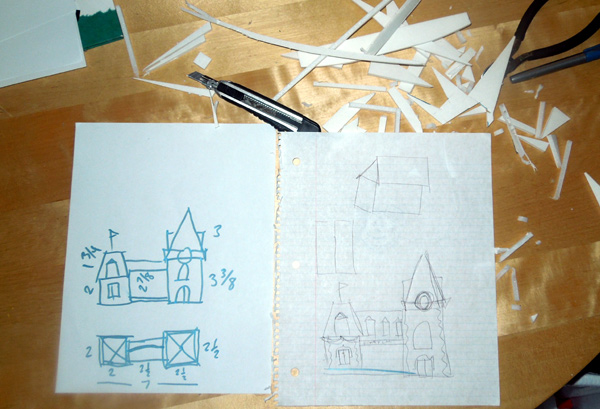
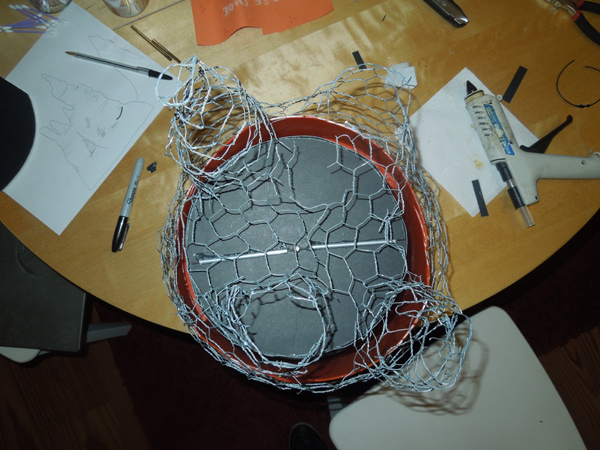
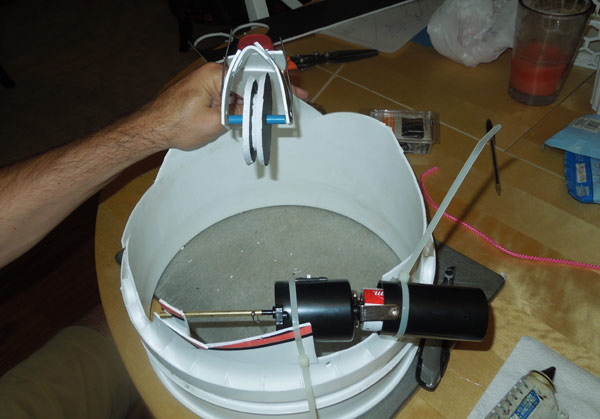
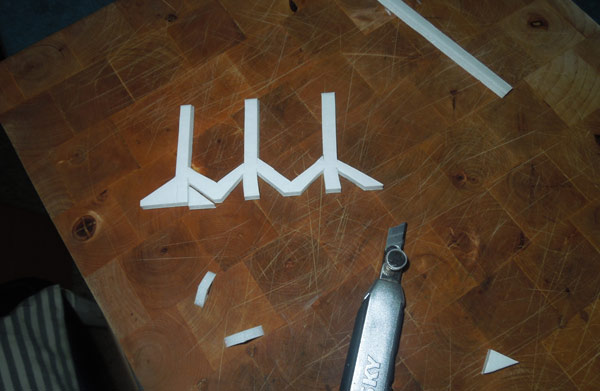
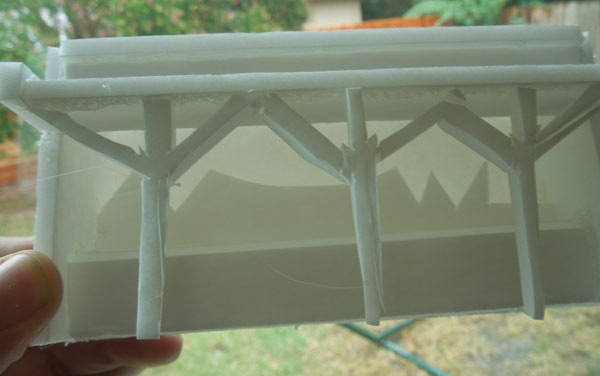
It worked! I attached a brass tube to the motor and drilled it to provide some structure for the rotating bobsleds. I decided that four bobsleds spinning inside would be ideal. At first I tried bare wire, but the wires tended to swing around uncontrollably when the motor was turning. I added a foam armature. Above is a photo of two armatures stacked on top of one another. Note that their shape is made to fit with the shape of an inverted 5-gallon bucket. A bucket fit the demand for a strong, circular arena for my rotating sleds. The exterior needed to look like a Swiss mountain, but the interior needed to be smooth, to avoid anything catching onto the rotating effects inside. I also wanted the mountain interior to be accessible . I added a cowl of chicken wire to sculpt the moutain shape. Ready for paper mache! Small World Did you know that every ride at Disneyland has a page on Wikipedia? Small World's exterior is nothing more than a tall wide facade which conceals a huge warehouse which contains the 15-minute boat ride. The facade is another icon of Disneyland, random and incredibly detailed. I'd try to replicate this in miniature. Here is a sketch of what I was going for. I needed to accomplish this in about 18 inches of width. My first try in foamboard was a little too crappy. I quickly realized that I wouldn't be able to cut interior curves out of foamboard with an xacto knife. Also, those three tiny triangles looked ragged. I tried again. The second time I cut a couple of stencils, hoping to spray on some of the geometric details. It worked! The silver paint added just the right amount of implied detail. But I couldn't resist adding more details with a silver marker. Next up, the teacup ride! Teacup Ride
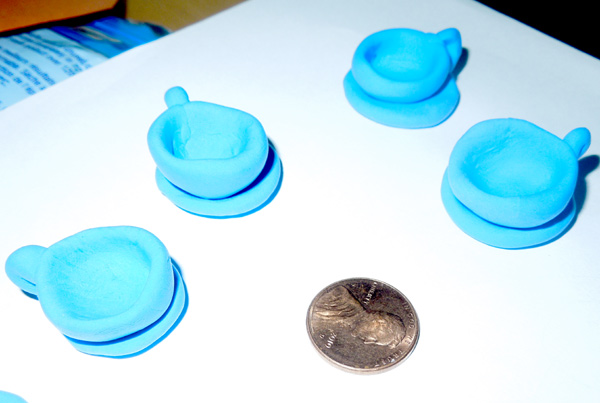
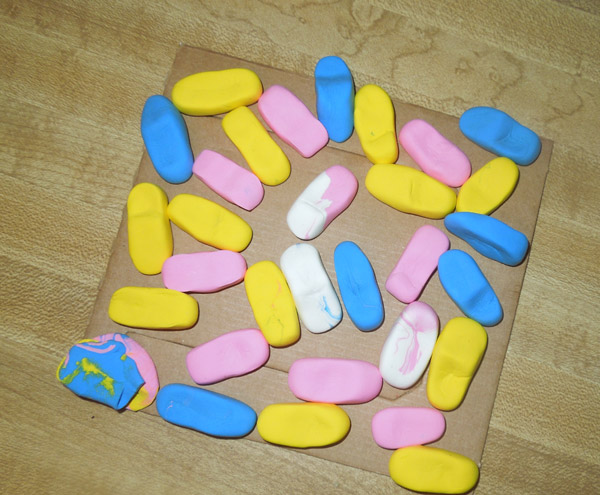
The next ride I tackled was the Mad Tea Party ride. I had specified a seven-inch diameter circle on the map for this one, so the indivdual cups were going to have to be very small.
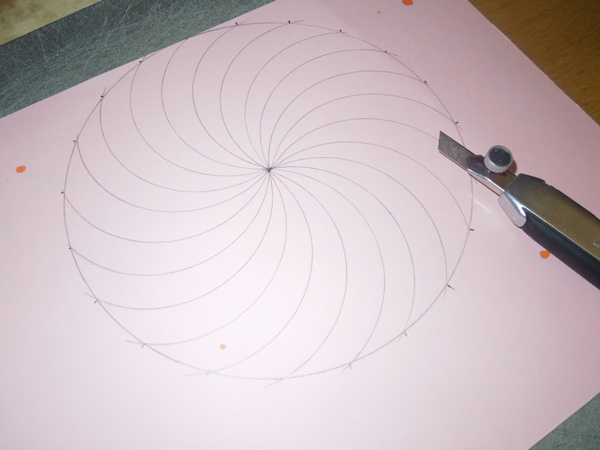
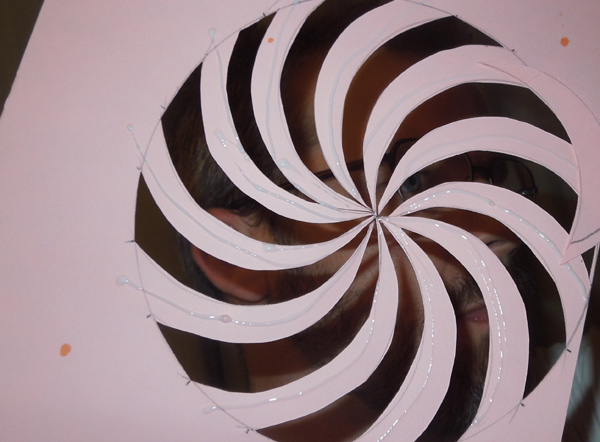
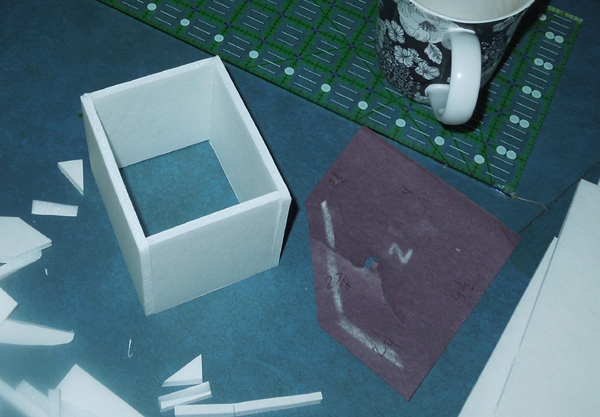
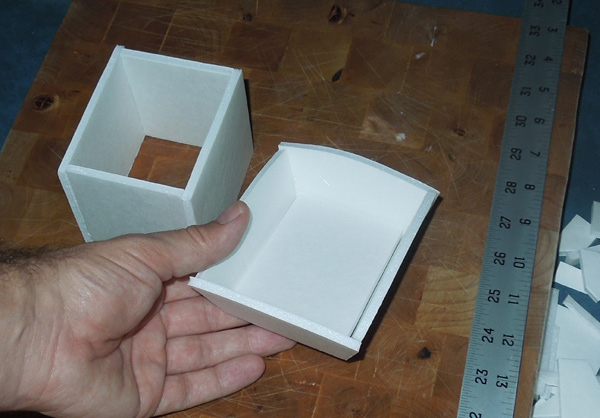
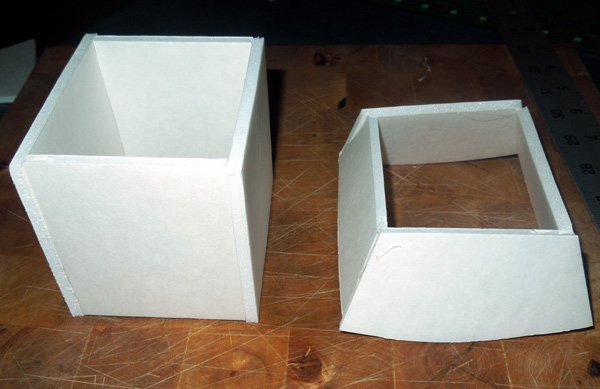
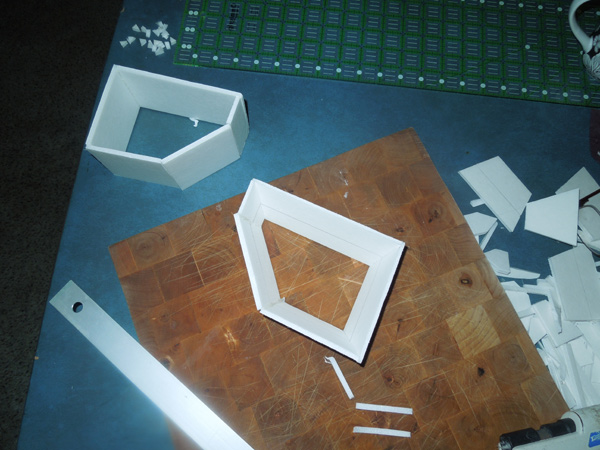
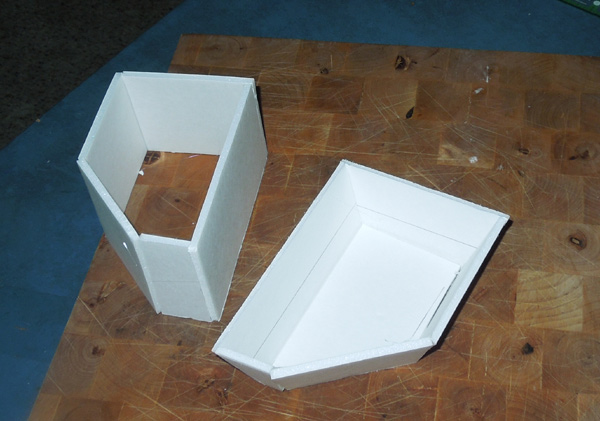
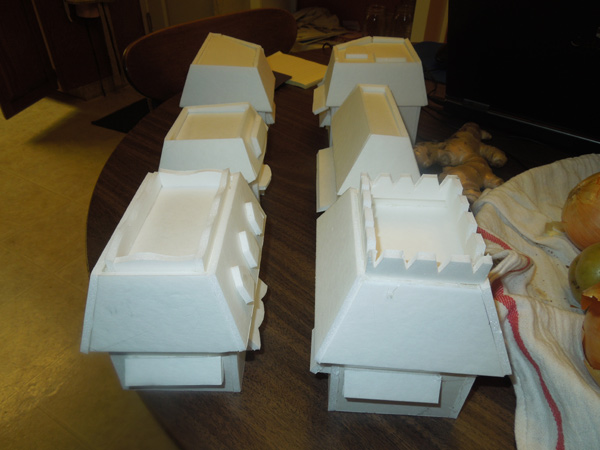
I had already bought some blue air dry clay, the generic version of Crayola's Model Magic clay, and started shaping some tiny cups with my fingertips. Air dry clay is very spongy and easy to work with if your finished objects aren't too large or detailed. The floor of the teacup ride is a pinwheel pattern, one of my favorites. I sectioned off the circumference with marks every half-inch and used the curve of a cup to trace arcs from the center to the edge of the circle. Then I cut out every other section. Then I taped the pink spiral onto the purple circle and got my spiral floor. Teacup ride! This would be a great ride to animate, but I wasn't sure how visible it would be behind my castle head. Main Street USA Main Street USA is the landmark entryway to Disneyland, containing a few restaurants and a bunch of souvenir shops. My floorplan specified six seperate buildings lining this entry street. They were each about five inches tall, and were supposed to look like American buildings from the 1910s. Obviously I'd use foamboard and hot glue. The roofs had flat tops, and were pretty fun to construct. They went together like a little square bowl. Walls and roof. Completed building. Second building was pretty much the same. It just had little faux dormer windows. Main Street USA (Continued)
For the northernmost buildings, I wanted them to have five sides.
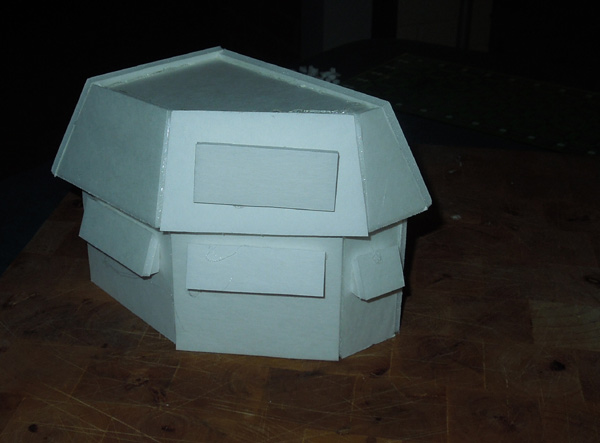
Measuring the roof panels against the walls. Assembling the angled roof segments. Dropping in a top panel. And glueing it all together. Here are three of them, unpainted, obviously. The black shapes on the ground are the placeholders from the full-size map. Here are all six of the completed buildings. Awnings galore! The entrance to Disneyland is through two tunnels under the Disneyland train station. The amount of detail on all of the actual buildings at Disneyland is just absurd. Here is my finished foamboard version. To create a small model of Disneyland... or I guess a large model, I had to strip away a ton of details and just include the basic forms of each building. I was happy with how things were coming together so far, but I was starting to get nervous about all of the buildings I would have to paint. Thunder Mountain Railroad
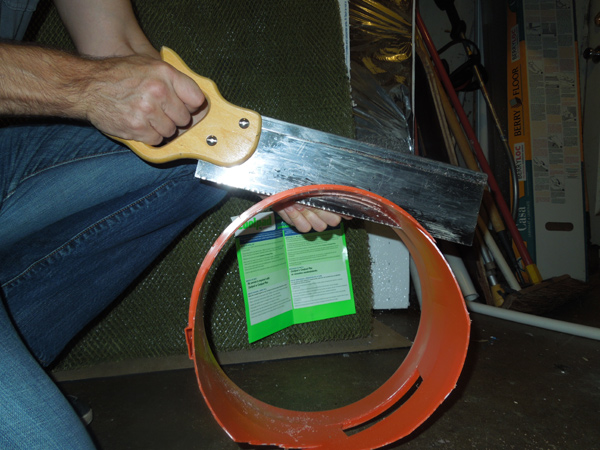
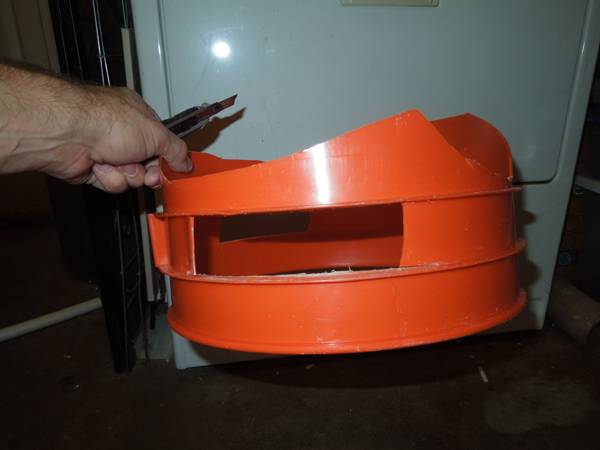
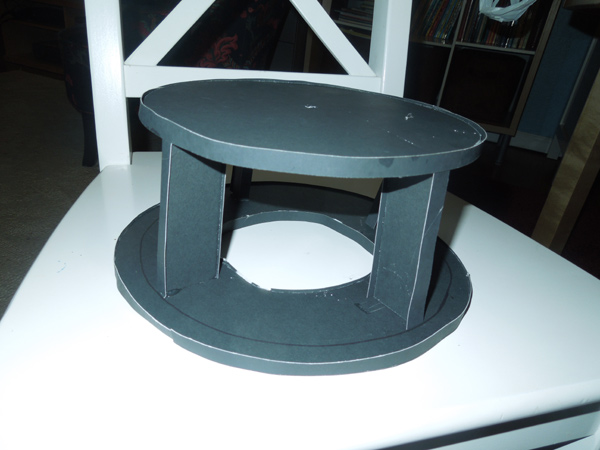
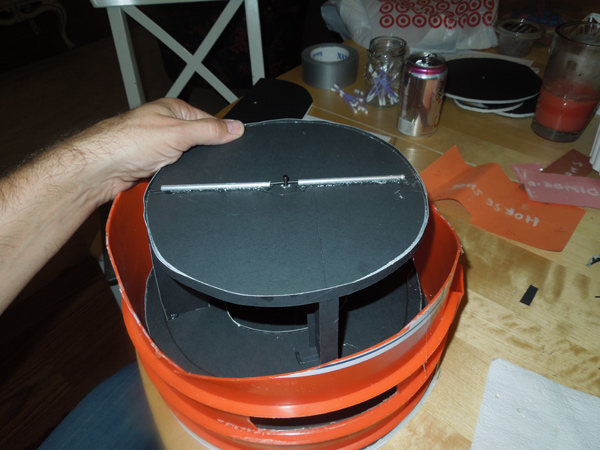
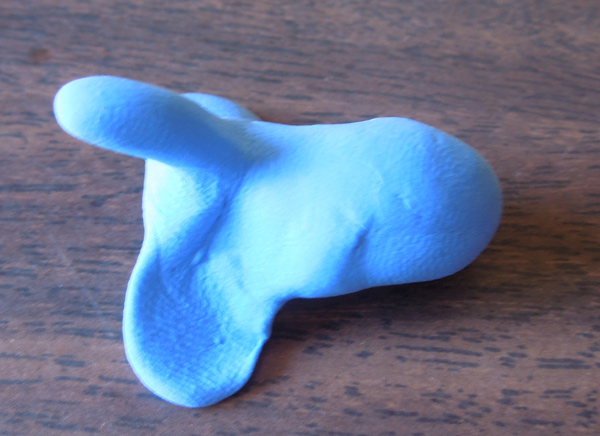
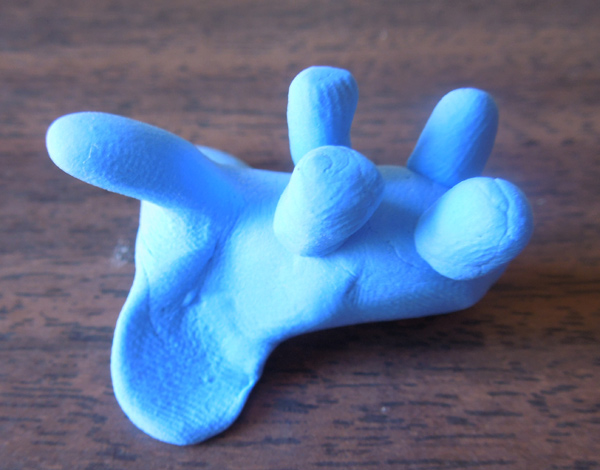
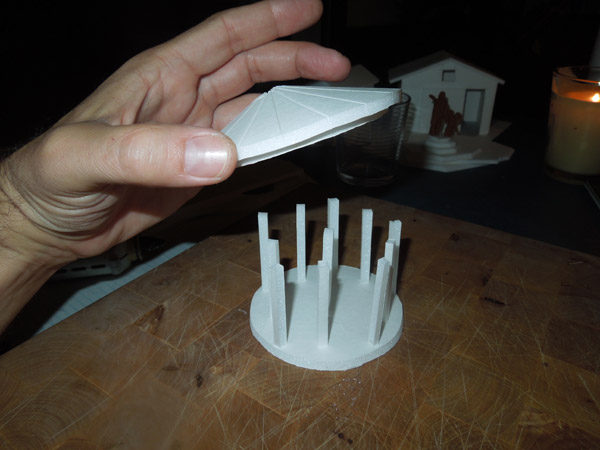
Thunder Mountain railroad is a roller coaster, and I planned for this attraction to have a tiny roller coaster moving inside, similar to the Matterhorn model. I started with another 5-gallon plastic bucket. Although this mountain would be covered with paper mache, I couldn't rely on an entirely chicken wire construction. The buckets are very lightweight and strong, and the precise cylindrical shape would ensure that my interior movement wouldn't get caught up on unexpected design flaws. The moving train cars would be visible through this cutaway. The plastic walls of a five-gallon bucket are too thick safely cut with a razor knife. I use a razor knife. I used two circles of black foamboard to construct a featherweight double-decker turntable. The turntable was mounted on a slow, battery-powered motor, designed for turning a disco ball. The only part of that motor visible in this photo is the very top of the driveshaft in the center of the turntable above. Two tiny aluminum tubes are hot glued to the foamboard. They hold a long metal rod which acts as a cotter pin to hold the turntable to the shaft. After checking the clearance as the motor turned, I added Thunder Mountainous rock formations with chicken wire. This would be covered with paper mache. Dumbo, The Flying Elephant ride The map layout indicated a tiny Dumbo ride, not much larger than a bagel. I used more air-dry clay to fashion a tiny elephant body, shown here upside down. Next I added four tiny legs. I added a wrinkly skin texture with a scanning electron micrograph. Just kidding. Those are my fingerprints in the clay. Splash Mountain
Unlike my first two mountainous roller coasters, Splash Mountain is a water ride. Instead of making a tiny log which circles the mountain, I aimed to create a tiny log which slides down the front into a jumble of thorny bramble bushes.
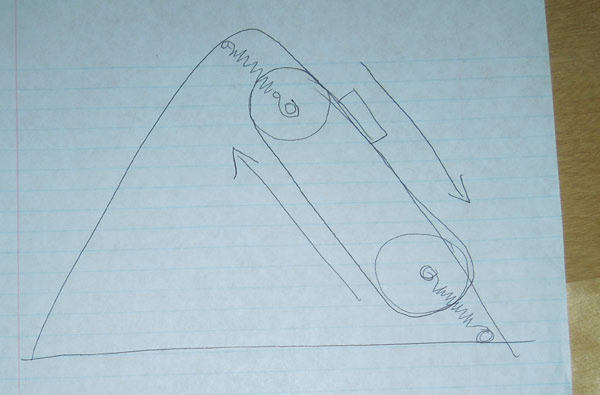
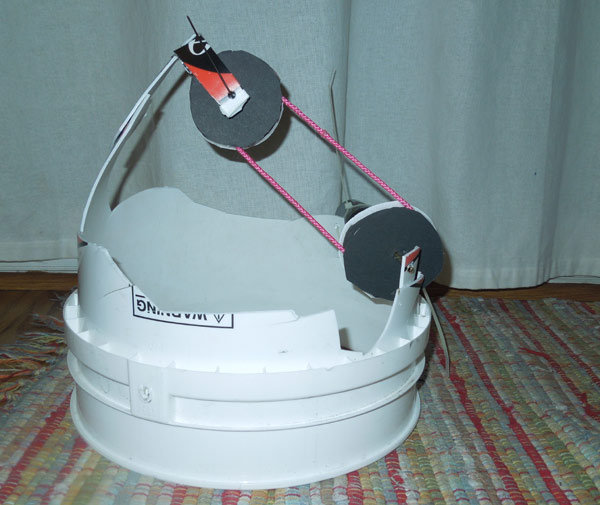
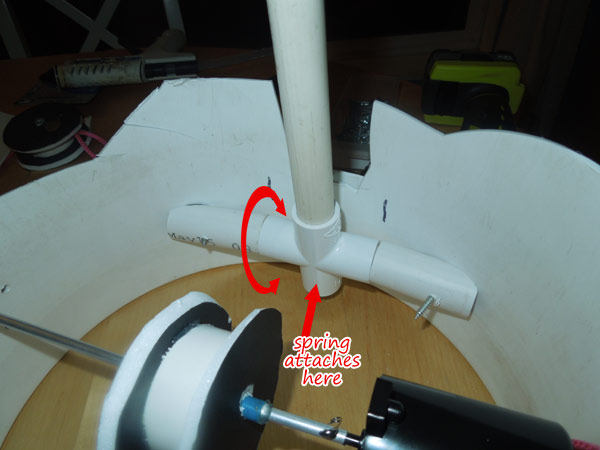
I wouldn't be satisfied with mounting a log onto a vertically rotating drum. That wouldn't look anything like a waterslide. I needed a long ramp that a plain orbit wouldn't approximate. I needed a belt drive. A belt drive is harder to engineer than direct-drive shaft-driven turntable. I needed pulley wheels, a drive shaft and a belt. Belt drives need to be tensioned, pulling against the belts with at least as much force as they are trying to exert on the other pulleys.
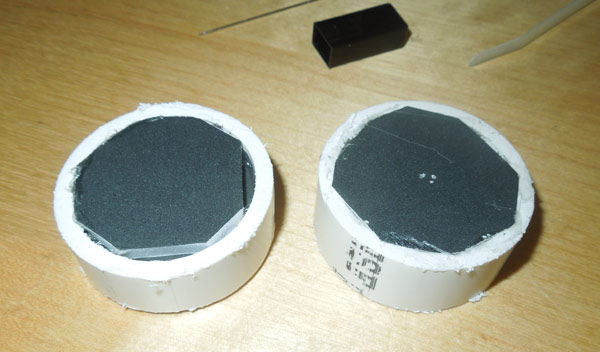
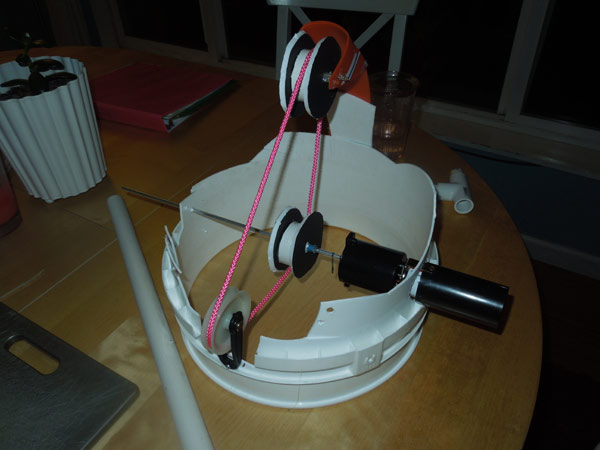
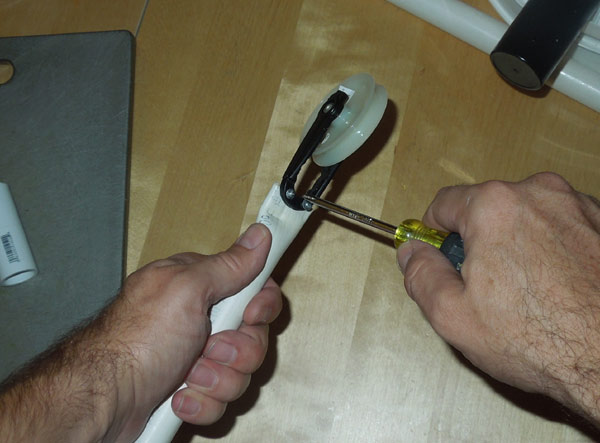
My first tactic was to make pulley wheels out of foamboard and use a thin pink rope for a belt. I mounted one of the disco ball motors at the base of the bucket. My design flair was flaring up, so I left part of the bucket intact, bending down the upper edge of the plastic bucket to make a pulley mount. I had an idea that the resiliency of the plastic bucket would be the ideal dose of tension on the belt. It would be an elegant solution. I had a few problems. The shafts weren't aligned well enough, the pulleys weren't well engineered and didn't have enough friction to grip the rope. I added a third pulley. I made new pulleys out of a cross section of 1" PVC pipe. I re-aligned the motor pulley. I cut an old bicycle tire to make a cyndrical cover for one of the pulleys (Another option was to make a belt out of the tire). After about three hours of tinkering, it was time to give up the bent-bucket spring idea. It didn't provide enough tension. I'd have to abandon some of this construction and start again.
Splash Mountain
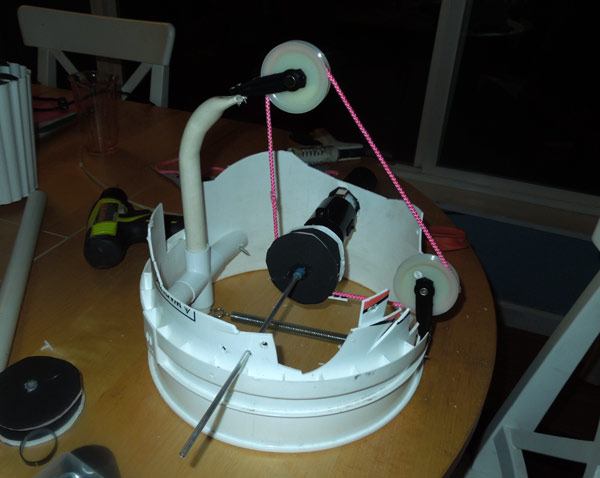
To include a real spring, I put the top pulley at the end of a short pvc pipe. The bottom of this pipe was attached to the bucket on a pivot. It was actually kind of tricky to mount a pivoting pipe to the rounded interior of a bucket. I used a short rod inside a four-way pipe connector. this was the hinge pin hidden within the horizontal section of pipe shown above. A screw eye held one end of a strong spring, keeping the top pulley in tension, pulling away from the pulley at the bottom of the mountain. The increased tension made the pink string cascade down the front of the (not yet realized) mountain. Success! Alright, maybe "cascade" isn't the right word. It "travels" down the front of the model. Frontierland Shooting Exposition The shooting gallery is an open-walled stall made of rough-hewn logs. I made a scale version out of foam board. I left all the clumsy slice marks in these tiny beams to duplicate the look of the rough beams in the real version. Inside is a low wall and and even a row of hills for imaginary targets to hide behind.
Mickey and Minnie's House A few more basic structures remained to be built, including Mickey and Minnie's house. I spent a surprising amount of time poring over source photos for these models, because there are at least three different versions of each house, and I had a hard time figuring out which photos were from which Disney park. Of course, after I found the authentic Disneyland version, I found them to be very tricky to build in miniature and out of foam board. Toon town is warped.
My versions were built mostly built with right angles. Luckily it only takes a few crooked elements to make a whole neighborhood looked cockeyed. Jungle Cruise
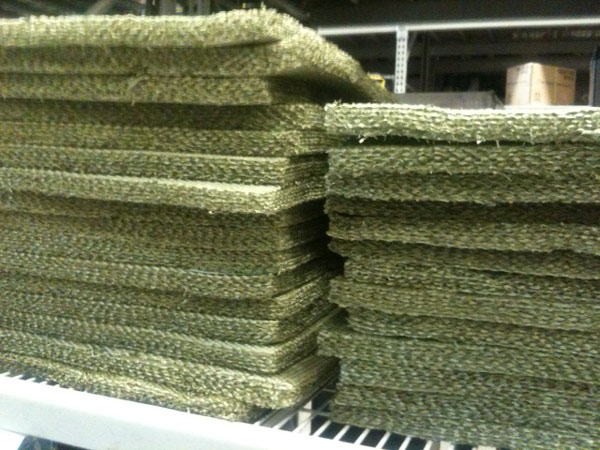
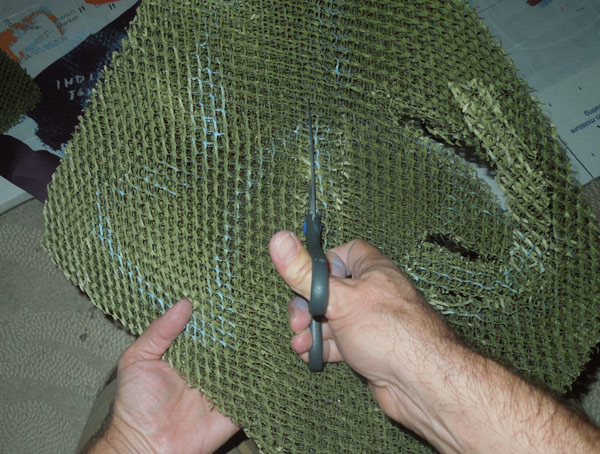
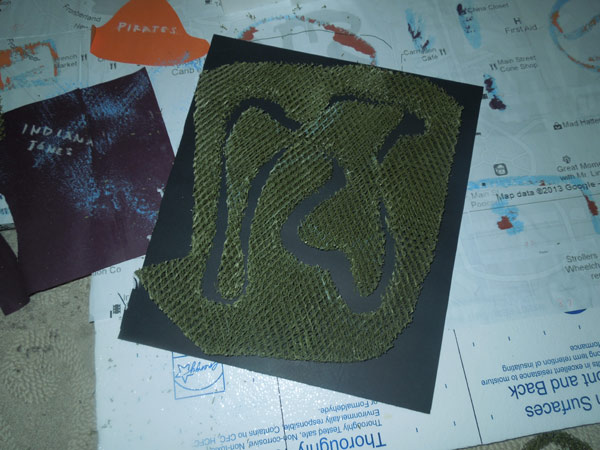
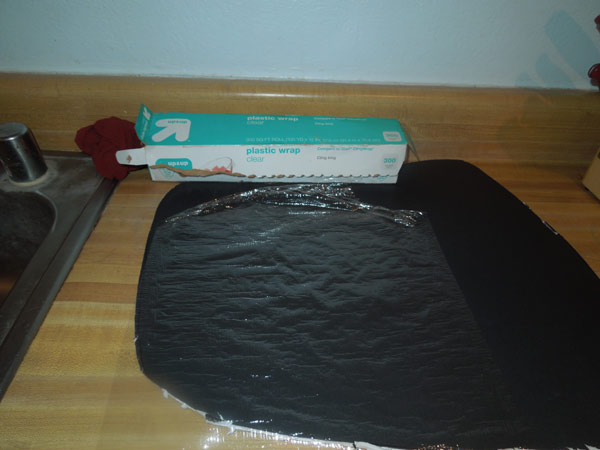
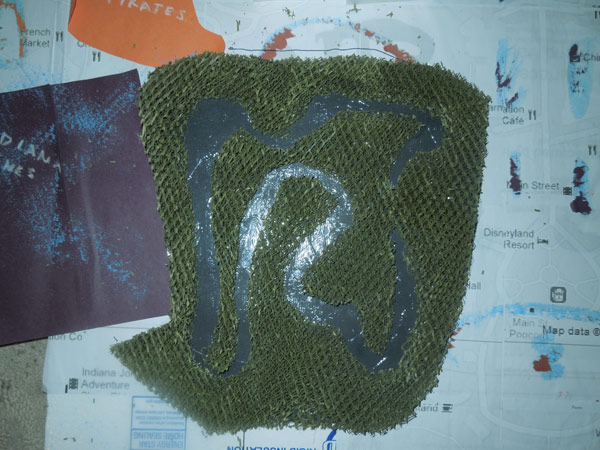
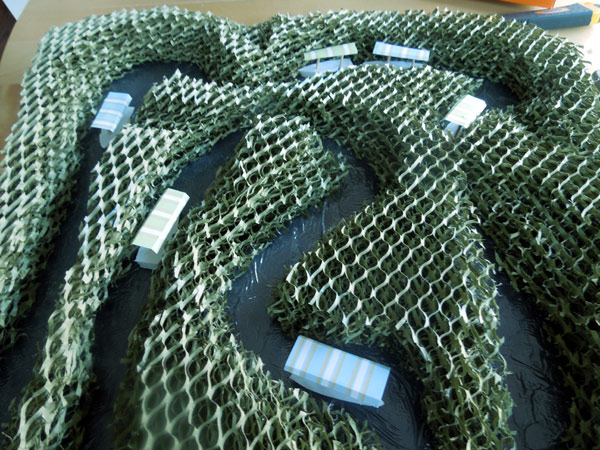
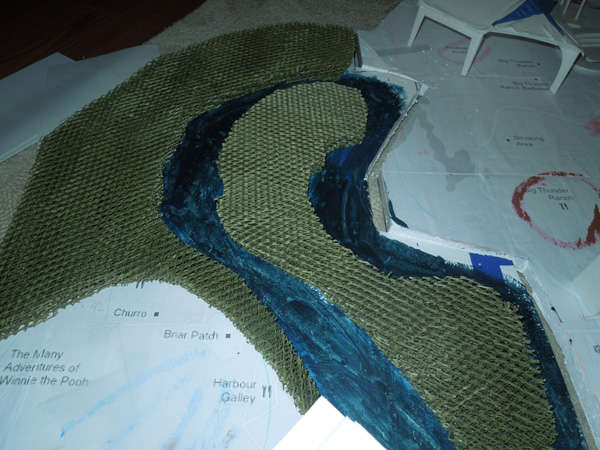
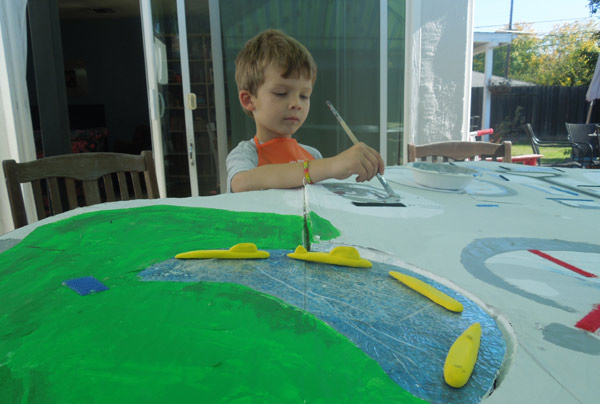
The Jungle Cruise is a real boat ride, through thick vegetation. Creating a scale model of vegetation isn't usually very easy. I could buy and place 50 tiny trees, but that would make Jungle Cruise twice as detailed as my other ride models. When I spotted this stack of evaporative cooling pads at Lowe's hardware store, I thought I might have found a solution. Evaporative coolers are a cheap kind of air-conditioning which is generally used for large warehouse spaces. They cool the air, but increase the humidity. Sometimes they are known as "swamp coolers". The pads are green and are designed to have as much surface area as possible without inhibiting air flow too much. The effect is a nice organized surface which is uniformly detailed. This would make a great jungle! I started with an appropriately-sized patch, drew the path of the river in chalk and cut out a narrow channel. This would look great! If you squint your eyes, you can see that the Jungle Cruise follows a pathway a bit like the outline of the continents of the world. North and South America on the left, Eurasia and Africa on the right. To create a look of water, I examined some water effects used for model railroading. There were some good options available, but I was won over by one of Matthew Albanese's fantastic landscape tricks: Plastic wrap.
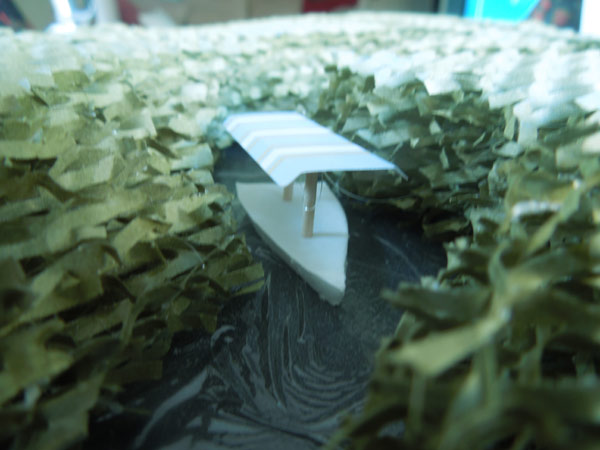
I used spray glue to attach the plastic film to a base of black foam board. The film was hopelessly wrinkled, but it looked a lot like dark river water. I glued on the jungle mat, and made some little boats. Flat boats seemed good enough until I discovered a cache of striped paper in the house. I made a tiny sun canopy with toothpick supports.
I love this photo! I couldn't have asked for better water ripples than what I'm seeing on this plastic wrap. They are really superb.
Plus! I made a swamp out of a swamp cooler pad! The results were really great! I loved my new jungle cruise, and I couldn't wait to see it nestled on the big map between Main street and the Indiana Jones pyramid. Astro Orbiter
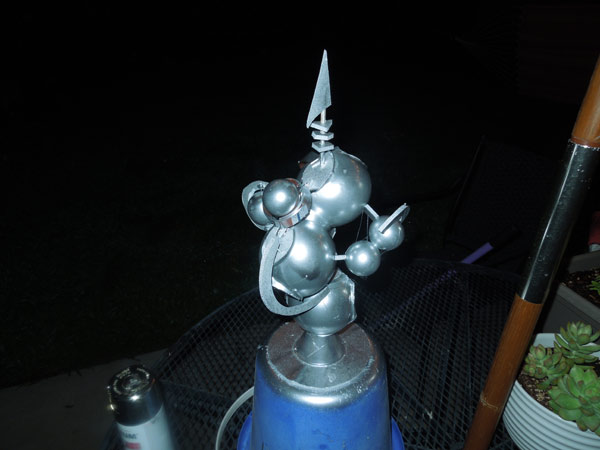
The Astro Orbiter is the shiny rocket-ship ride at the entrance of Tomorrowland.
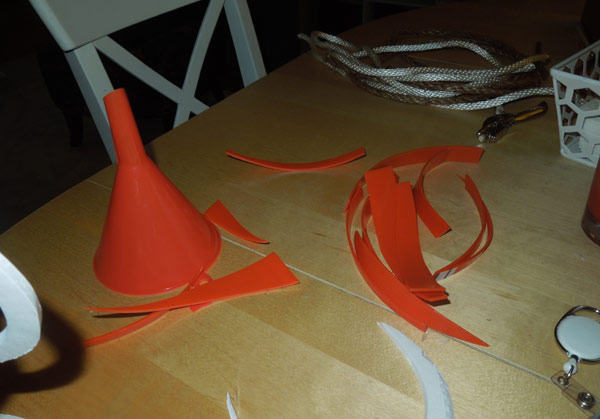
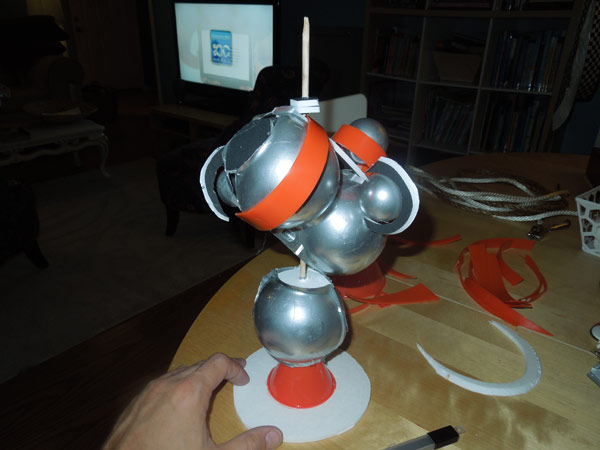
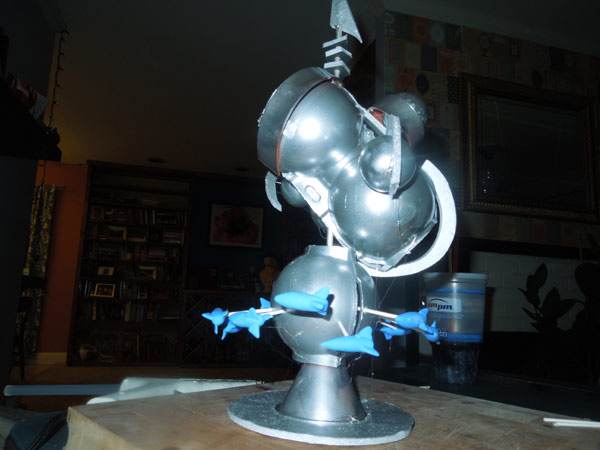
Astro Orbiter is ridiculously complicated and detailed. It is also shiny and metallic, which meant that I'd need to use materials with smooth surfaces. Foamcore wouldn't work well for this. I made my Astro Orbiter model out of this plastic apple tray, ping pong balls and thin slices from a plastic bucket. I also used a funnel. Getting rounded plastic shapes like these is easier than it used to be, but slicing that plastic bucket was hazardous. The material was just thick enough that I had to really put some muscle behind cutting it with a utility knife. I had to use some yoga moves to ensure that I was always cutting away from my own body. I started by spraying the apple tray balls and ping pong balls with silver paint. Then I assembled the plastic strips and shapes with hot glue, starting with a single wooden dowel rising through the funnel base. It was late at night when I spray painted the Astro Orbiter. The spheres were already silver, so this paint job was to hit the orange curved sections and unpainted foamcore.
I stepped back and took a long look. It looked rad! It was detailed, complicated, shiny, retro, brilliant. I threw my arms into the air. This was awesome. I was two for two. The Jungle Cruise looked great, and the Astro Orbiter looked spectacular. I was in hyper buildfast mode. In the middle of September I was trying to get in under the wire to enter the HUB television network's halloween costume contest. They were looking for the best costumes in each of the 50 US states, on route to a grand prize of $25,000 for the best costume in the country. As the end of September approached, I realized I would never, ever be done with any version of this costume by that deadline. But the push had been vital in using my time wisely. I might be building a masterpiece. I was determined to make each attraction fine and finished. There were an awful lot of parts, but my hyper September had ensured that I had a whole other month to get this costume painted and polished.
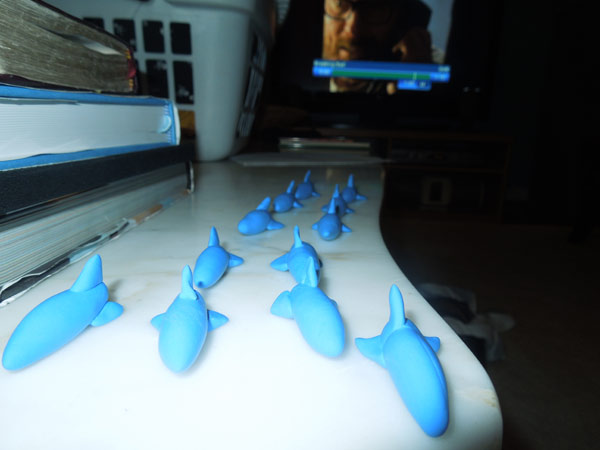
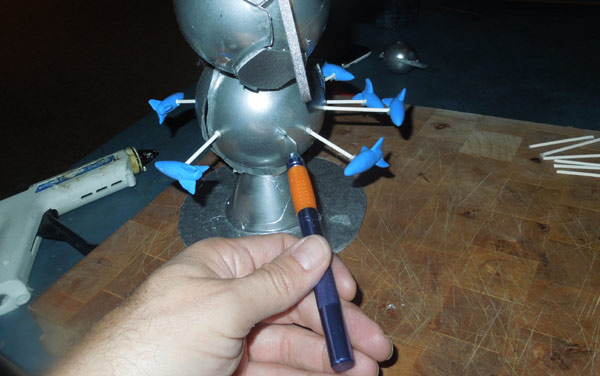
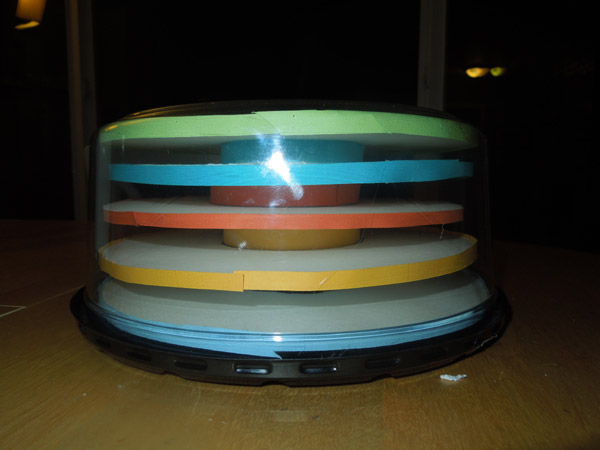
I liked my chances. Rockets for the Astro Orbiter. I sculpted these out of air dry clay. They are small. Mounting the rockets on twelve tiny white Qtip arms. I'm really feeling good about how many of the tough attractions I have already finished. In particular, Jungle Cruise and Astro Orbiter. They are completely finished, checked off the list. Innoventions I've never actually been inside the Innoventions building, so I pulled this version from fantasy. I cut six round floors of foam core and stacked them into the clear shell. I cut long strips of colored construction paper and glued it to the edge. It looked pretty good, very Disney futuristic, in my opinion. Submarines I also molded a batch of simple roadsters for the Autopia exhibit. The Storyland canal follows a long, thin oval of water within the railway berms of casey's circus train. This was kind of a genius move, because Disney got two rides out of one batch of landscaping and eye candy. It doesn't seem possible, but encountering another form of conveyance on the trip enhances the experience. Their ride becomes a focal point of your ride. To create these two rides I started with the basic, ground level layout and cut out the waterway. I would paint both the water and the landscaping, so I taped plastic film to the bottom where the water would be visible, then glued islands on top of it. The northern end of the oval is taller and supports the circus train. I may end up covering all of this in green modelling clay or fake grass. Pirates of the Caribbean Fantasyland Theatre
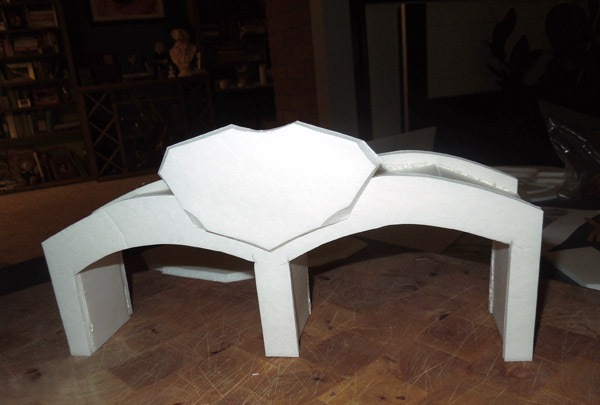
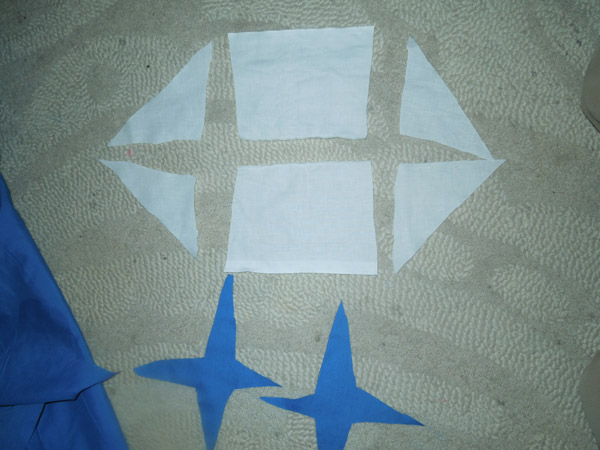
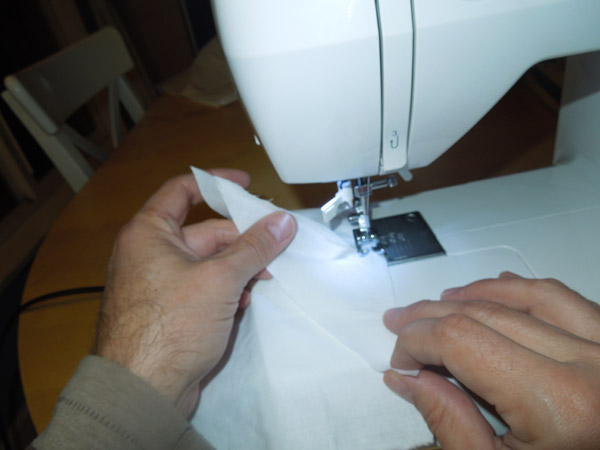
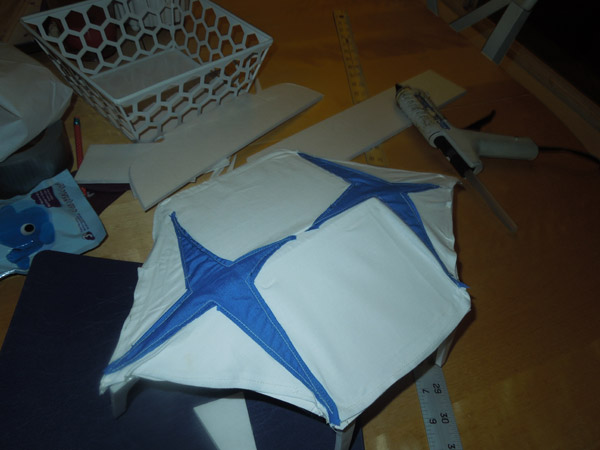
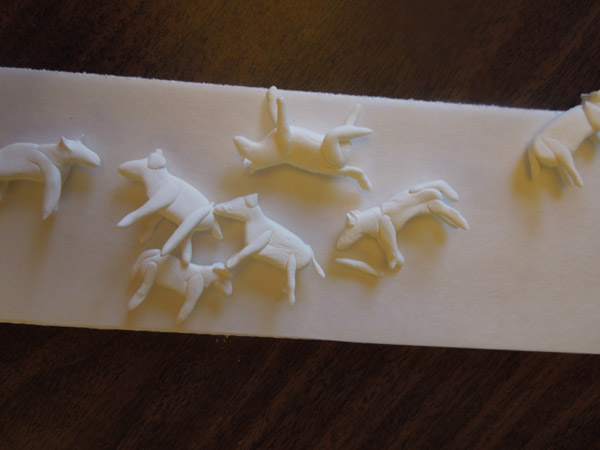
The fantasyland theatre is a huge tented area in the rear of the park. I had an idea that it would be cool to have this structure made of real fabric.
I used some blue fabric remnants and some simple white cloth to create the twin peaks circus tent appearance. I sewed the pieces together from the underside so that the seams wouldn't show. If I didn't have a sewing machine, I'm sure hot glue would have worked just fine. After I had the fabric stitched together, I glued it to a hastily-constructed foam building in roughly the correct theatre shape. Tragically the fabric tent became folded and wrinkled, distorting the ideal tent shape. From "The Disney Enthusiast" website: "The Partners statue stands at the center of Disneyland. Walt holds Mickey's hand as he grandly gestures over the world he has created" Brown air-dry clay was the best option I had to recreate this bronze monument. I don't think anyone will notice the difference. King Arthur's Carousel I sculpted a team of horses from white air-dry clay. This stuff isn't the correct material for fine details, but I gave it a shot. Some of them ended up looking more like cows and dogs, but the overall impression was positive. I figured I had better paint it before I glued in the carousel horses, so I gave it a complete wash of gold paint on the inside, then glued the horses to the perimeter posts Star Tours I started with the pathway of the coaster tracks, grafting several pieces of foam roadway together to form the complete course. To get all the parts of the roadway together, I cut relief cuts in the path so that it could be bent into small ramps and loops. The result was a complicated tangle. It looked great! I added a bunch of thin stilt legs and a small building for the loading/unloading hut. I probably spent the most time with the Splash Mountain belt-drive, but the turntable mechanisms were a bit less reliable, so they held the threat of having to be repaired from below. For paper mache I bought a Sunday newspaper. The news used to come on these.
Eight and five years old, I don't think my kids have ever read the Sunday comics in the newspaper. I tore it into long strips, about an inch and a half (5cm) wide. The glue is water and flour. I use my hand to break apart the clumps and get a smooth paste, about the consistency of gravy. Then I drag the strips through the paste and squeegee most of it off between two fingers. The first strips are difficult to lay down, as the wet paper doesn't stick well to the chicken wire mesh. The strips do stick well to themselves, so after a few strips are stuck, the rest are easy to lay down.
As I alluded to above, I had been anticipating this step for months, and once I was ready, I ran with it. It was midnight when I started, 2 am when I finished with the cleanup.
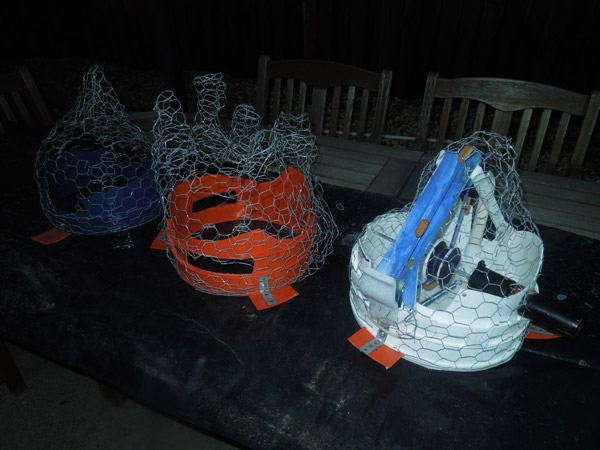
The next morning, my mountains were starting to dry. That's Splash mountain on the left, the Matterhorn in the middle and Thunder Mountain Railroad on the right.
They looked superb! The Colombia and the Mark Twain The Colombia is the boat which looks like a pirate ship, pointed at both ends with three masts and sails. I built up several layers of ship-shape foam and glued them together, adding a rear and fore deck at the top. I used some wooden skewers for the masts. The Mark Twain is a paddlewheel steamboat. It is more of a blunted rectangle, with four distinct layers set on top of one another. Twin smokestacks decorate the front. These boats looked great in white. I hoped that these two boats on the distinctively shaped Disneyland river would be another crowd pleaser. I certainly loved them!
The map above was sectioned off into a grid.


Actually I ended up with an odd number, so I had to fudge a couple of the segments so I wouldn't end up with two holes in a row. 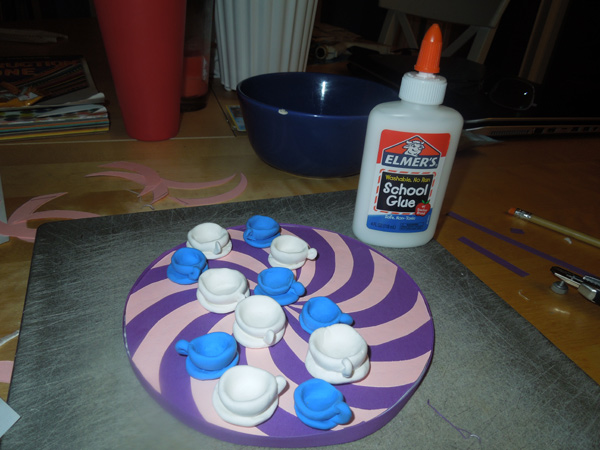
Six white teacups came next, then the pink ones. 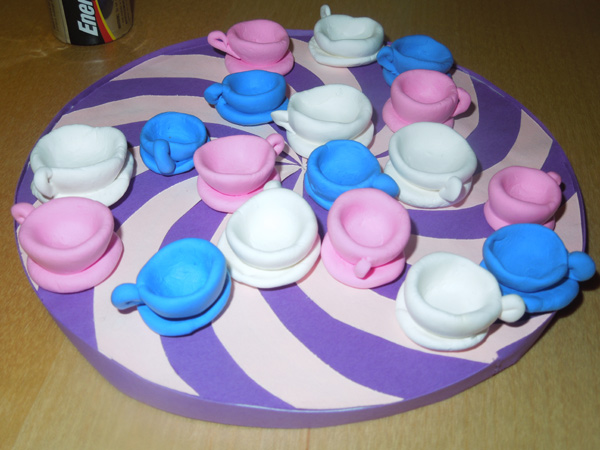


Looming on the build list were a number of C-ticket rides. Creating these miniatures wasn't going to be as fun or satisfying as crafting the iconic rides such as the Matterhorn and Small World. I'd have to be vigilant, as it would be tempting to half-ass this part of the costume. 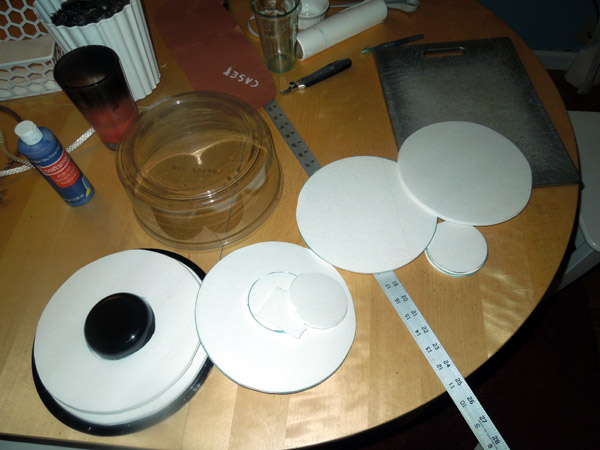
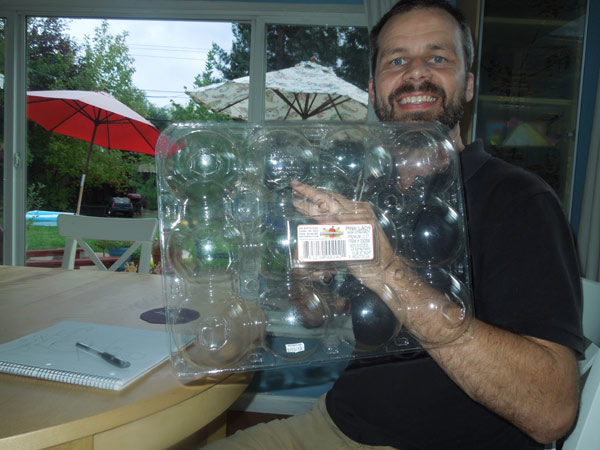
I couldn't let go of this perfectly round clear plastic bundt cake shell, so I made it into the "Innoventions" building. The size fit my concept map perfectly: 10 inch diameter. 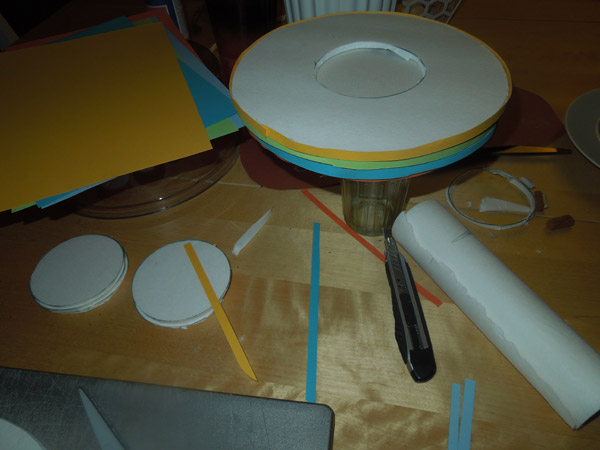
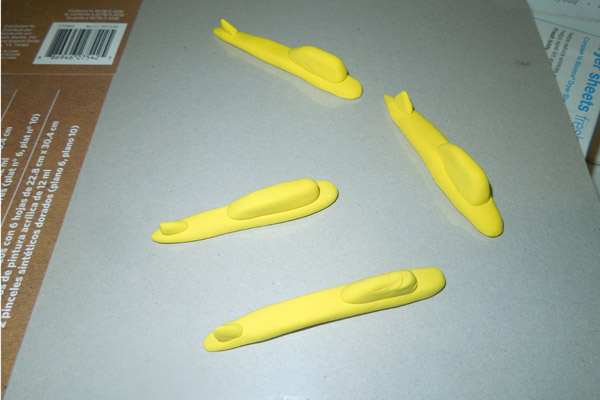
The submarine voyage is another water ride, tucked right beside the black Tomorrowland roadway of Autopia. I needed a lake and some submarines. Air dry clay was my medium. I rolled out seven subs, or rather the top of subs, complete with conning towers.
Storybook Land Canal Boats
The storybook boats and Casey's circus train share a dumbbell-shaped chunk of land at the northern end of Fantasyland. It was surprisingly difficult to find good pictures of this area, despite the fact that these rides are outdoors and wide open. I consulted the Google maps rendering of the intersecting pathways.
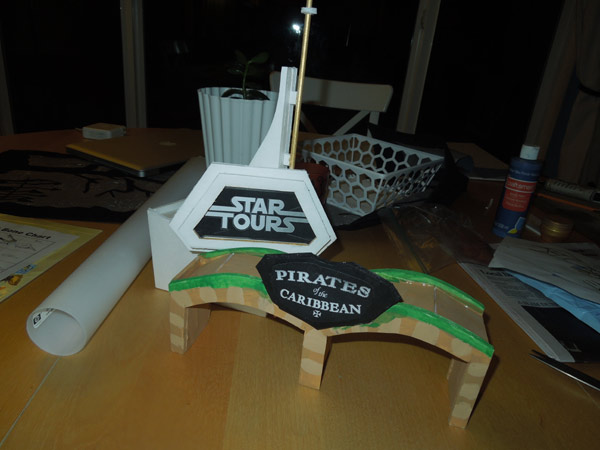
Most of the indoor rides at Disneyland have a special exterior; the Small world facade, Space Mountain's snow white cone. Pirates of the Caribean is different. It doesn't lend itself to a miniature rendering on a model. My master plan-o-gram specified a pirate hat to represent this attraction, but when it came time to actually create the model, I opted instead to recreate the dual entry archways.
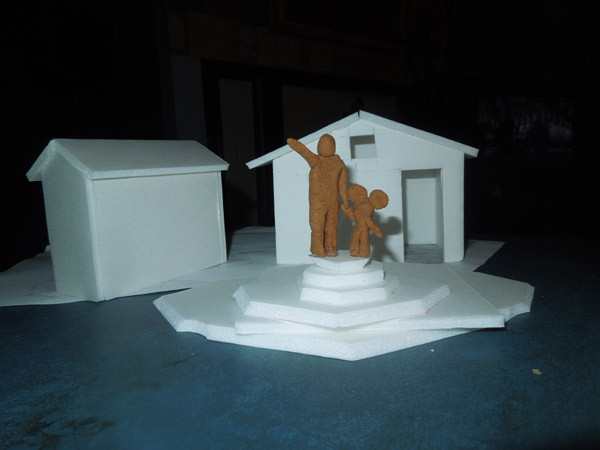
Walt Disney Statue
The center "hub" park of Disneyland is important, but there isn't much there. Grass, bushes and a statue of Walt and Mickey. The statue is definitely the defining feature of this area, so I crafted an oversized version, nearly two inches tall.
This costume project has obviously created a need for me to closely examine the variety of rides within Disneyland. I've made a couple of interesting discoveries. For example I've learned that the submarines in the Submarine ride travel below the Autopia roadway. Another is that there are three rides which go around in a circle in Fantasyland: The Teacups, Dumbo and the carousel, and they are all three within spitting distance of each other.
The Carousel is simple enough to recreate in foamboard. I cut two circles, support beams and a multi-segmented cone for the top.
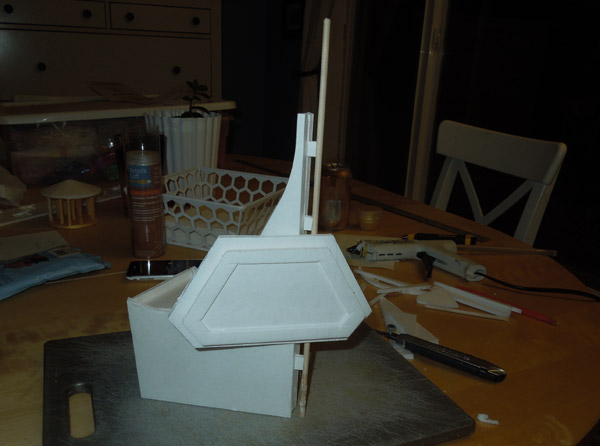
Much like the Pirates of the Caribbean, Star Tours doesn't have much of an iconic building or entrance. The shape of the "Star Wars" title is the strongest design cue. For this attraction, I created the tall lightning rod of the entrance with a triangular base and mounted the signpost onto the front of it.
Gadget's Go-Coaster
As I stated earlier in this tome, all of the Toon Town attractions have been intimidating to recreate in foamboard. They are curvy, not well-known rides which will be difficult to render and have a low impact on the overall look of the costume. One of the final constructions was Gadget's Go Coaster, a kid-size roller coaster with a chipmunk inventor theme. 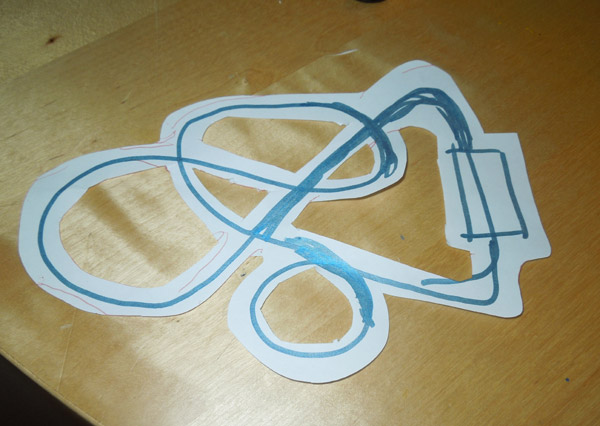
Paper Mache for the Mountain Coasters
I was determined to get the mechanisms for the roller coasters working well before I forged ahead with the paper mache skin.

I should have been exhausted, but I was exhilarated. This was a big step towards Disneyland coming together!
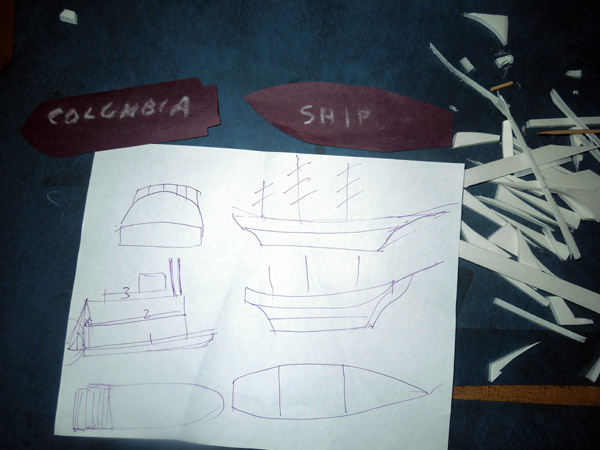
Almost done with miniature construction, I had saved the two river boats for the end. These were going to be fun! I studied the basic shapes and made some sketches. Next I started cutting pieces out of foam board. 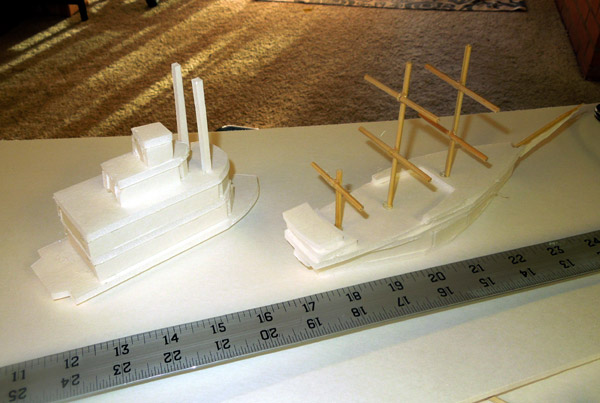
This is a complex costume. To be frank, I've been coasting on "great idea" costumes for the last ten years. Disneyland is more than a great idea, it is complicated and detailed. There are 33 different buildings to be constructed and painted.
Last year, as a tornado, I lost a contest to a giant transformer robot. The transformer was not groundbreaking achievement in engineering (as far as I could tell), but it was huge, and it was obvious that it had required many months to assemble and polish.
I want Disneyland to leave this impression, to prompt this question: "Jesus! How long did that take?!".
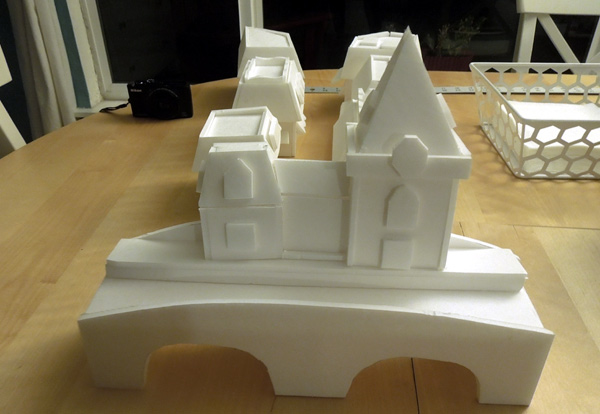
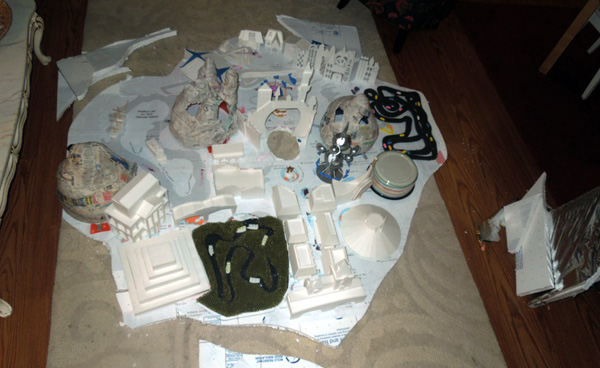
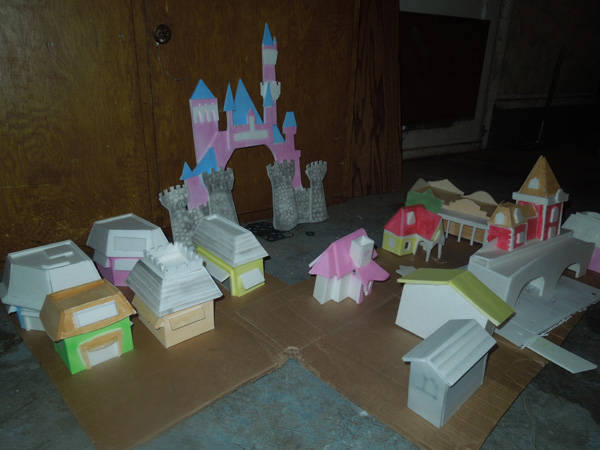
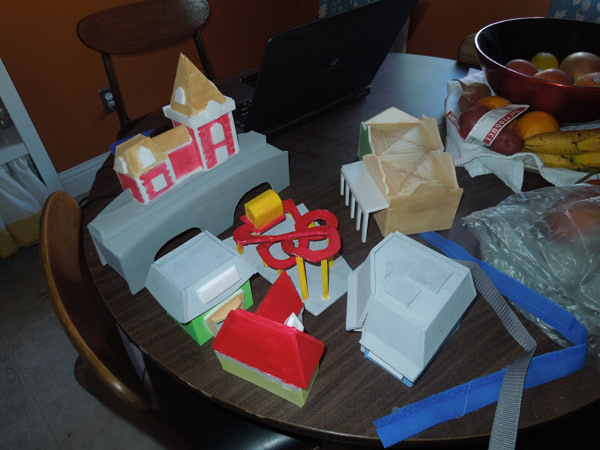
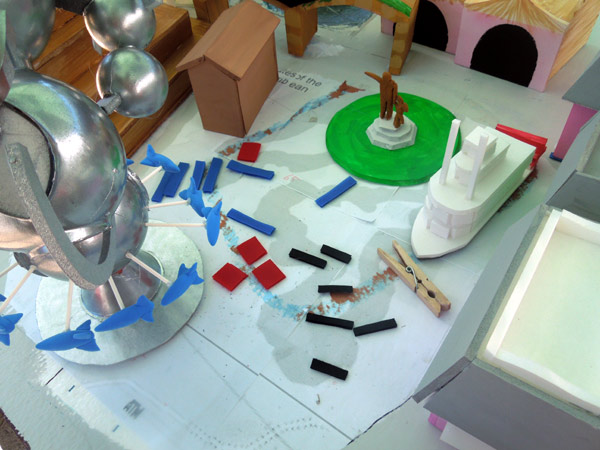
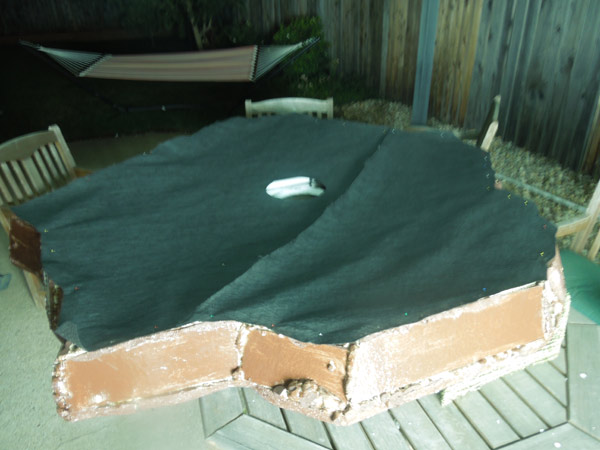
With all of the buildings finished, it was time to figure out the land mass, to see if everything was going to work on the styrofoam stage I had assembled. I layed the styrofoam map out on the floor and started placing attractions. Damn, there are a lot of parts to this. The map got more and more crowded, but I wasn't happy with how it was coming together. It looked cramped and junky!
My version of Disneyland omits all of the transitional areas between disparate attractions. Hopefully it would look more appealing once I had everything smoothed out and painted. The easiest step was to mark a footprint for everything and to paint all the spaces in between. This area would generally be the pedestrian pathway, so I painted it grey.
It started to look better almost immediately.
I couldn't transport the entire platform in one piece.... or rather I preferred to not rent a truck to transport it. I preferred to not have straight seam lines between pieces, so I cut around a few attractions to help hide the seam. I think it worked. The middle section was 48" at its widest, which would fit in the Honda Pilot.
Next I traced the wooded area around the "Rivers of America" water and cut more evaporative cooling pad to fill this area with greenery.
Painted Matterhorn
Scott offered to let me borrow his airbrush to help paint all these buildings. Thanks Scott! An airbrush is like a tiny, tiny spray paint can. It allows shading effects and smooth color transitions, but it also allows very very smooth layers of paint to be applied to a project.
But the airbrush isn't ideal for every painting application. My paper mache mountain needed a layer of paint to hide it's newsprint skin. I used a regular paint brush with a dark tan color, then I dabbed on a bunch of white snow. After some experimentation I realized that the snow looked better if I had solid white chunks instead of tons of white dots fading into the tan color. By the time I was finished, the coloring was distinctly "white" or "dark tan". A cartoon version of the mountain. I was extremely happy with it!
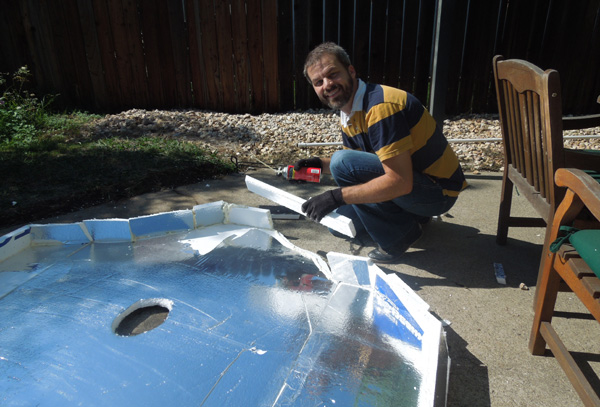
In the earliest imaginings of this costume, I thought it would be cool to have Disneyland perched on top of a chunk of earth. I had time, so I decided to add a thickness to the platform. This could look awesome and it would probably add strength.
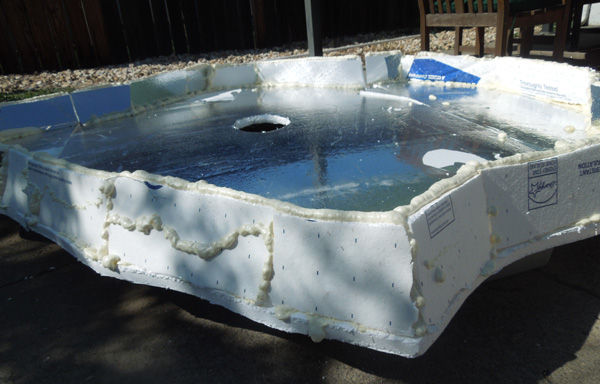
To glue styrofoam to styrofoam, I would use a can of expanding foam. First I had to cut styrofoam for a perimeter wall. A challenging complication was that the perimeter wall would look best if it was set at a slight inward angle. Luckily I've spend a lot of nights alone with a compound miter saw, so I was able to whittle and join these these complex angles at breakneck speed.
I preferred to save the cementing until I had all the pieces prepared. I used wooden toothpicks to keep the parts in place.
I am wary of expanding foam. It can be a disaster. On this day, however, it worked out perfectly fine. Incredibly, the one can contained enough foam.
It went together like a dream.
Painting the Main Street Buildings
I had studied photographs of the buildings to construct them, but now I realized I should have kept the good reference photos, because now I had to paint them. I researched which colors went where and made myslf a chart showing which color went where. I was hoping to avoid having to switch colors very often in the airbrush.
Painting took quite a while. This small neighborhood shot took the better part of a Sunday. I can't wait to see how the map looks with everthing in place and painted. First I had to work on the harness.
Finishing up some details. I didn't think I could paint these two signs with good results, so I just printed them out and stuck them onto foam board.
There were 100 little tasks to complete to finish the costume. Much of it was painting.
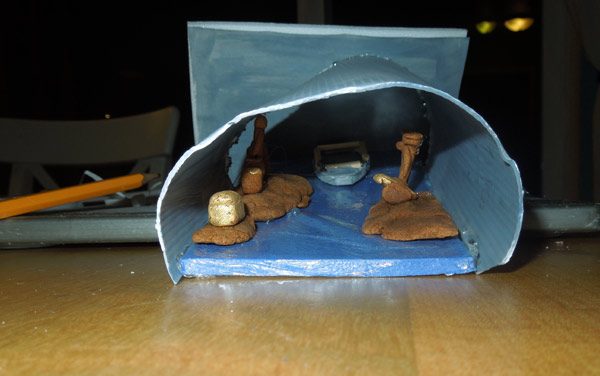
Above is a tiny scene which is supposed to be from Pirates of the Carribean. Because I added a thickness to the Disneyland platform, I thought it would look cool to add this peek into what was happening under the ground.
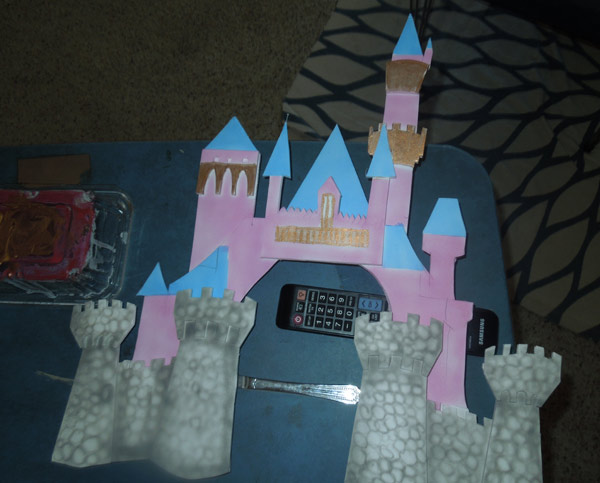
I added the final gold details to the castle in the center of the park. I also added a strap, so it would stay on my head as a hat.
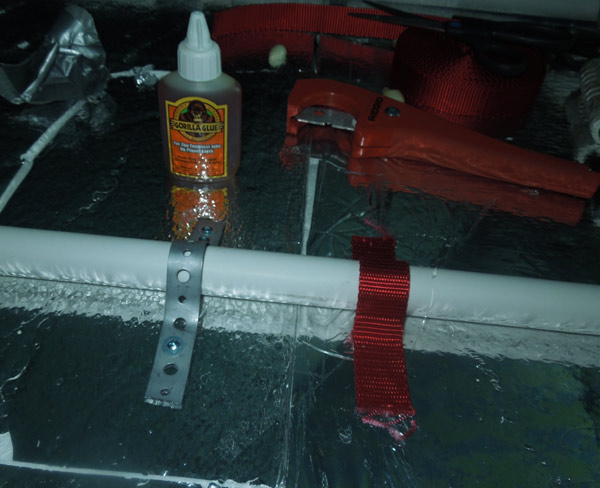
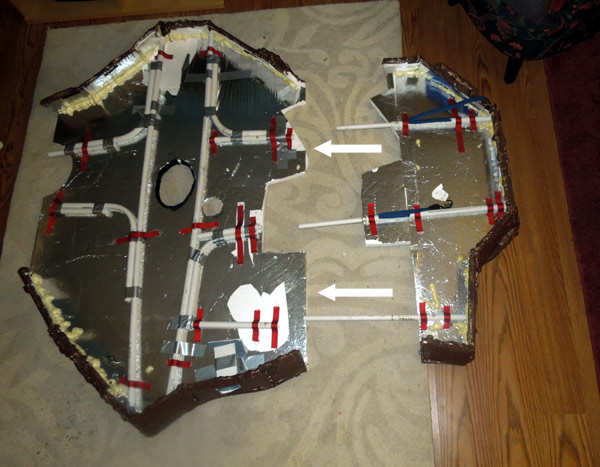
I needed to attach the main platform to a PVC harness. The metal 'plumber's tape' on the left was replaced by gluing the pvc to the styrofoam with 1" red fabric straps. The fabric straps were hot glued, and felt much more secure than the hilarious screw-into-styrofoam method.
A side view of the platform around my neck. The piece of the platform supporting the nearside of the park is removed in this photo.
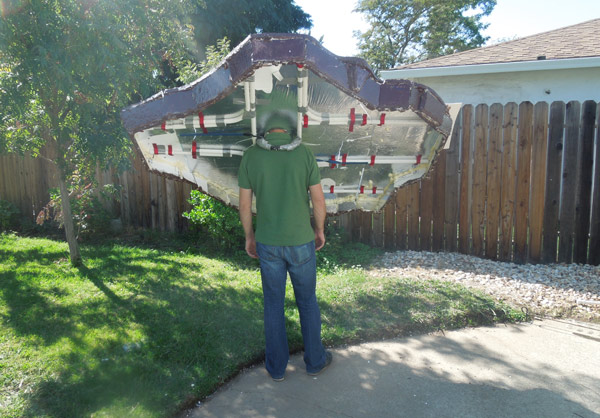
Once the platform was attached to the shoulder harness, I flipped the whole thing over and took it outside for a test run.
It felt great! The three parts of the platform were attached and sturdy. I could walk around easily.
I would have to do something to help conceal the underside of the costume.
At this stage, the platform weighed 12 lbs.
To aid in transportation, I didn't glue everything down. I used tabs of velcro. You can see the small bits of blue, black and red velcro above.
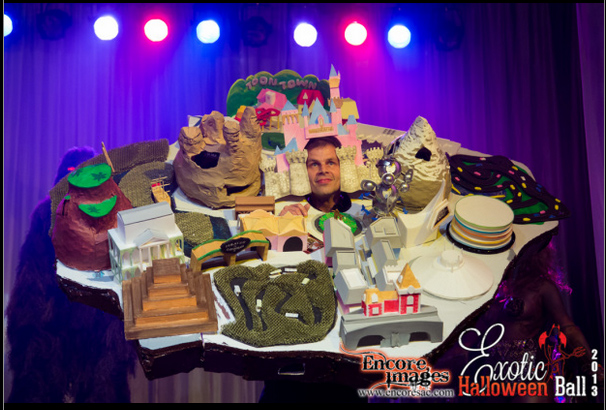
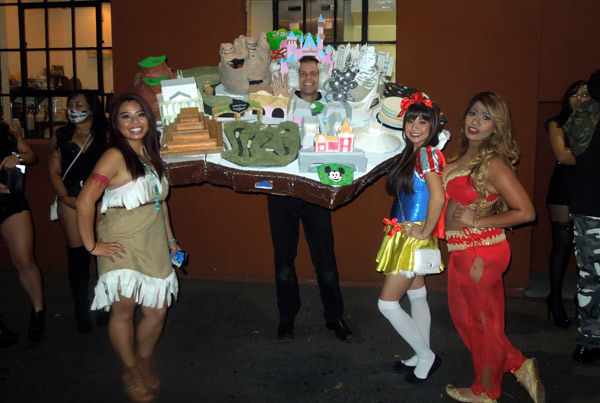
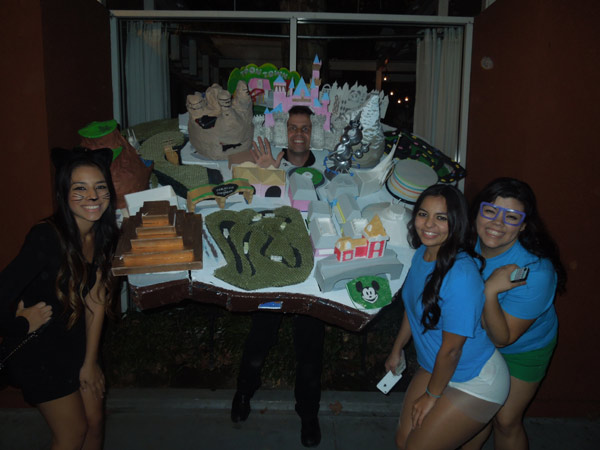
Costume Complete!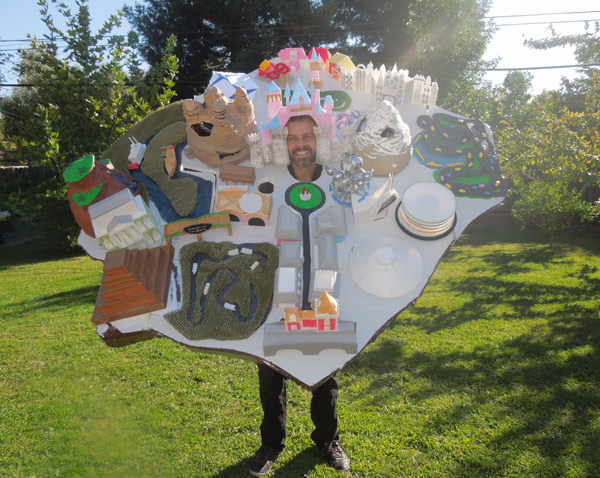
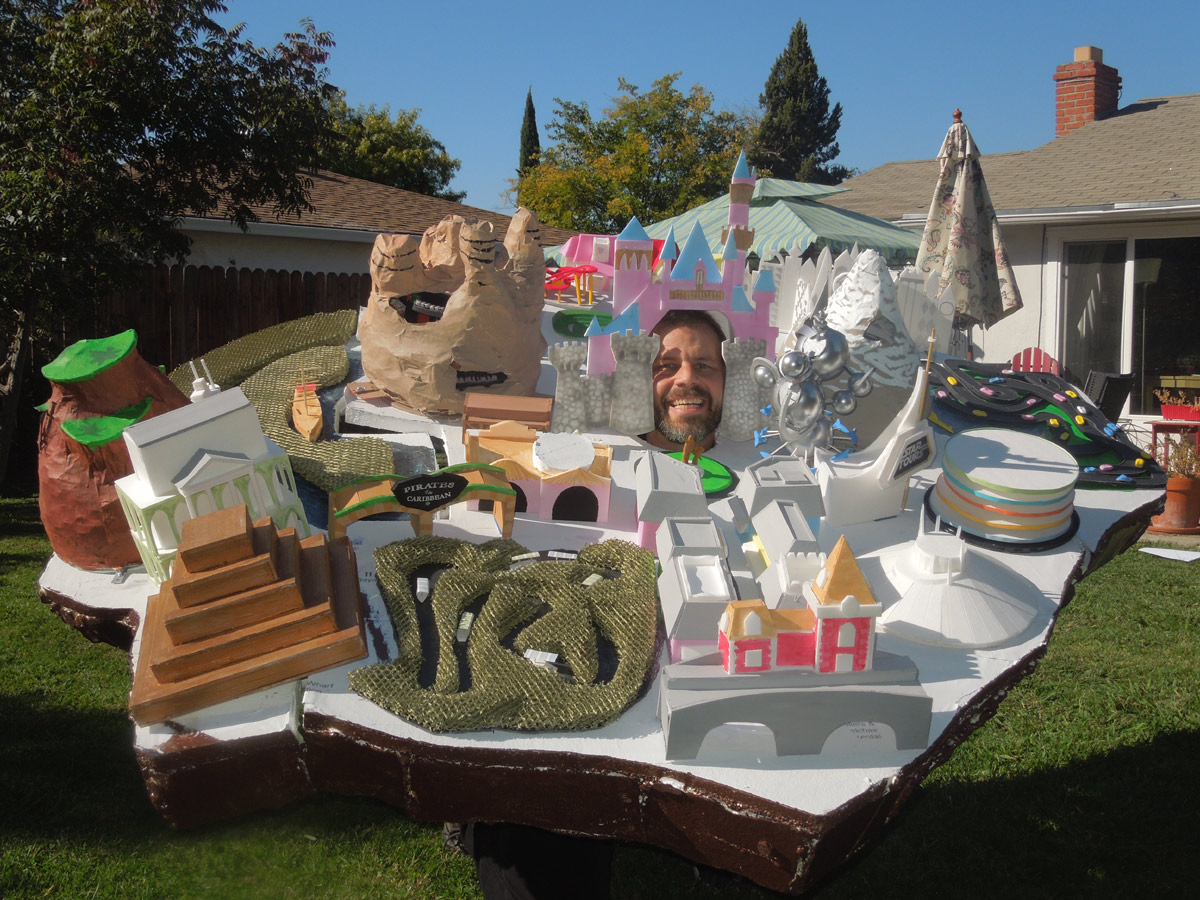
Here it is! The completed Disneyland Costume!
Sleeping Beauty's castle is on my head. I've got Walt Disney and Mickey right in front of my mouth, and a great look down Main Street USA.
Behind my head are the teacups, King Arthur's Carousel, Dumbo, the Storybook Boats, Small World and Toon Town.
To my right lay the Innoventions building, Autopia, the Submarines, the Astro Orbiter and the Matterhorn.
Can you see my nose in this photo? How about Monstro the whale?
It's going to drive me crazy to have my face so close to main street. Whatever they are cooking in Jolly Holiday smells fantastic!
The roller coaster animations in the Matterhorn, Splash Mountain and Thunder Mountain work well and aren't horribly loud. They are a bit subtle though, given the sheer size and volume of attractions featured on this costume.
You can click on the image above to load a larger version.

I love it! It isn't perfect. Space Mountain is almost invisible on the right, and with Splash Mountain weighing down the left, the costume is lopsided.
Hopefully I can get any bugs worked out by next Saturday. I'm going to try my luck at the costume contest on Saturday at Thunder Valley Casino in Lincoln, California. Wish me luck!
Update!
Change of plans. I'm going to the Exotic Zone Ball at Cal Expo in Sacramento.
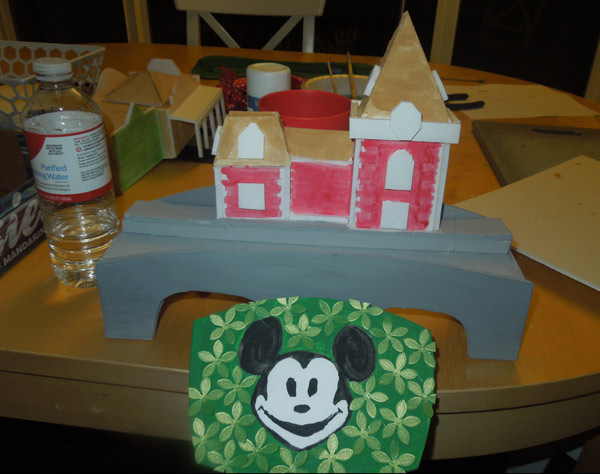
I had an artificial costume deadline of October 21st, so that the completed video could debut on the web while people were still in the halloween spirit. This also gave me a few more nights to polish up some details. For example, I painted the iconic mickey mouse face for the front of the train station. The green flower shapes were from Meaghan, a packet of Bride's table confetti.
I also got a chance to weigh the completed costume. It was 25 lbs. That's about the weight of an 19-month old child. Not too much at all!
When people asked "Is it heavy?" I replied "Not at first".
The kids helped finish up painting the base, and I was able to fix these submarines.
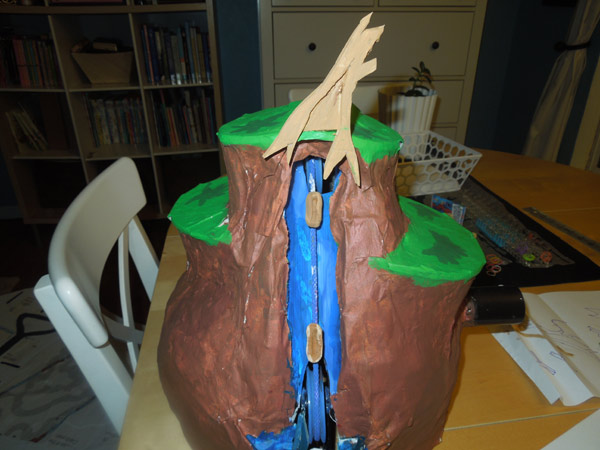
Splash mountain got a tree stump on top.
The "underground" Pirates of the Carribean scene was inserted into the side of the land mass.
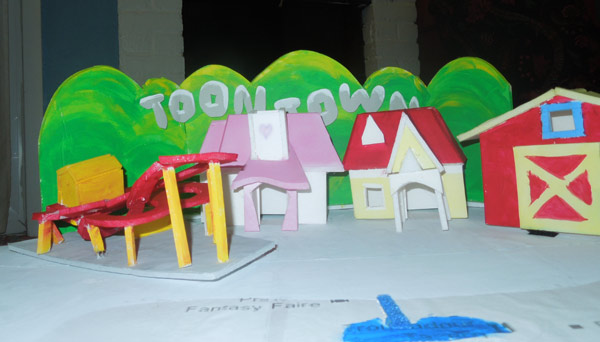
Toon Town got its green hills and signage.
I also strengthened the way the three parts were connected, so that the buildings on the two wings would remain supported.
And finally, I sewed together a black curtain to hide the pipes and construction underneath. I sewed 10 or 15 velcro tab pairs to keep it in place, but the structure was too flexible, and this black curtain couldn't survive the rigors of a costume party atmosphere. I ditched it.
Finally, it was time to go to some costume contests!
The Exotic Zone BallThe biggest halloween parties in sacramento are on the Saturday before Halloween. At the last minute, I decided to take my chances at the Exotic Zone Ball at Cal Expo. They offer a $5,000 top prize.
Actually, it is the only prize. Two years ago they ditched second ($1,500) and third ($500) prize so that they could roll all the prize money into one single prize. This makes this particular contest into a tense experience! It is winner-take-all!
Scott Holden, my fellow costume-expert, also made the switch to the Zone ball, in his stunning Transformer costume, made with actual sheet metal. He had started the night at a different contest, but couldn't get in because they had completely sold out of tickets.
We are friends, but it would still be a bummer to lose to him. We got to the contest at the beginning, parked next to one another and suited up. My friend Suzi came along to help too.
As we walked through the parking lot and into the security check, people were looking past the Disneyland costume to check out Scott's Transformer. This was a bad sign for me, excellent for Scott!
Before I could be in the actual costume contest, I had to get a "finalist" wristband by showcasing my costume on a little "audition" stage.
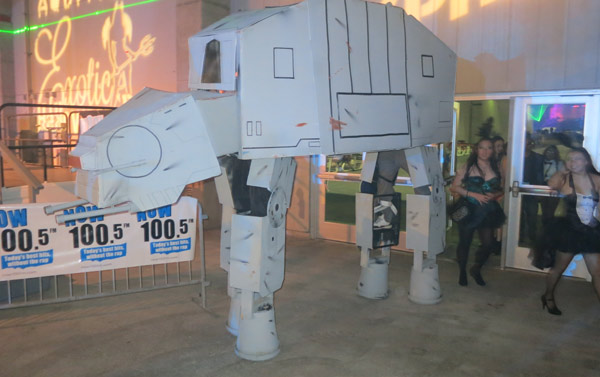
Before I made it to the audition stage, things were getting weird in the costume contest. They turned away Anthony in this giant AT-AT costume, refusing to give it a finalist bracelet. I ran into him as I went in. Neither of us could believe it.

Luckily, the judges at the auditions stage had a higher opinion of Disneyland. After a close look, they gave me a wristband without comment. I was in!
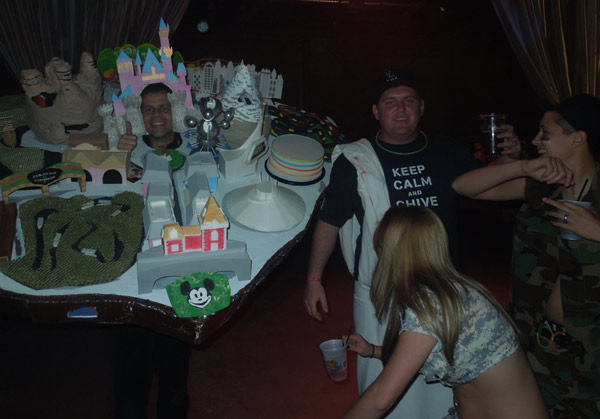
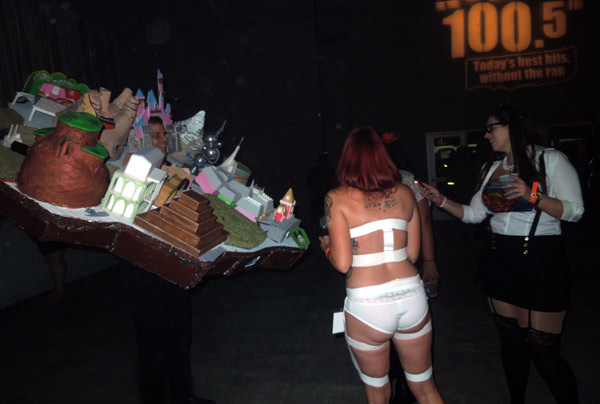
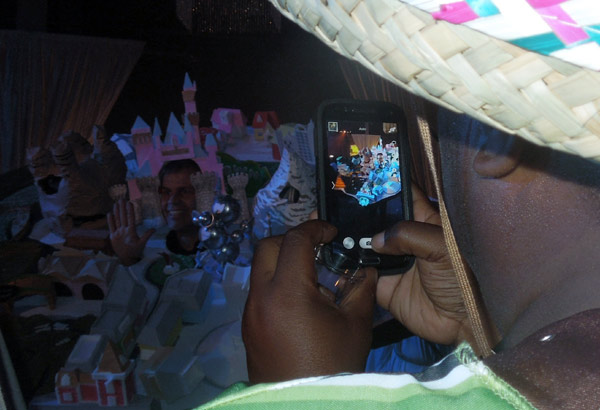
Once I got away from Scott's magnificent machine, I was swamped with adoration and bathed in the pico-flashes of hundreds of camera phones.
The guy above to my left was the first of dozens of men who had seen my costume build photos on "The Chive".
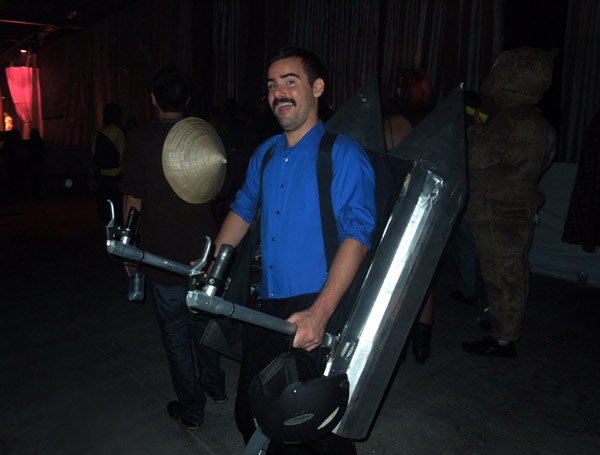
Here's Odie with a fake-legs rocket-booster costume! He didn't get a finalist bracelet either.
These photos look like I was at an empty warehouse, but I wasn't. It was a gigantic party, but I was too vulnerable to damage to stay in the thick part of the crowd.
Lelo and sexy Clark Kent.
Near midnight, the contests started. First there was a twerking contest. Then there was a "sexiest man" contest. Then there was a "sexiest woman" contest. Finally it was time for the Best Costume contest.
Scott's shiny Transformer was nowhere to be seen. Either he hadn't gotten a finalist bracelet or was lying dead somewhere.
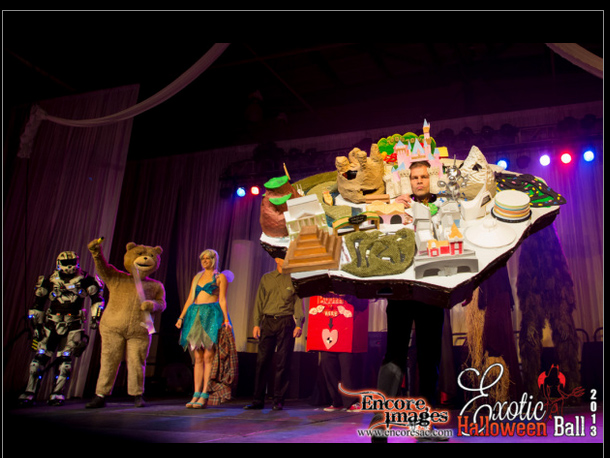
There were mostly regular-sized costumes in the costume contest. They included "kissing booth", an excellent Heisenberg, "TED" and "fairy". There was also a stilted swamp monster and a guy with a latex pumpkin head, a couple in silver body paint and a Darth Vader-like warrior. I liked my chances against this group!
When we were announced, the MC asked us to "show our stuff", which was weird.
I guess he was expecting a sexy display of some kind, after hosting a twerking and two more sexy contests. We obliged.
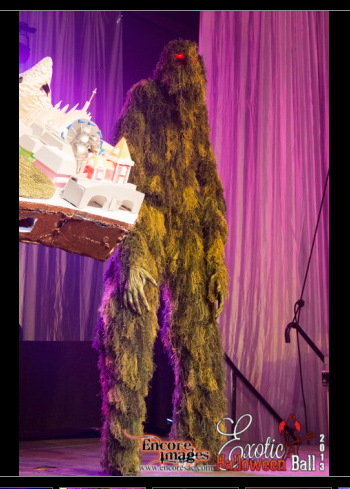
Tragically, however, Disneyland could not match the sexy pelvic thrusts of this swamp monster. The crowd got behind him and I couldn't match his moves onstage.
Swamp monster won!
Dammit!
Second Place!
Work Contest
Win or lose, I was relieved the $5,000 contest was over. I had been a nervous wreck for several days beforehand, and the only contests left were the contest at work and on Halloween night.
I work at Intel in Folsom, California. It is a big campus, with thousands of employees, so a lot of people come to see the costume contest. The costume was a hit, and no pelvic thrusts were to be seen.
As a contract employee, I was not allowed to win the contest at Intel. Guy with a baby body in a crib illusion took first place. Mr. Potato head took second.
Finally, on Halloween night, I headed out to the Park Ultralounge for their $1,000 halloween costume contest. I met some Disney princesses in line, waiting to go in.
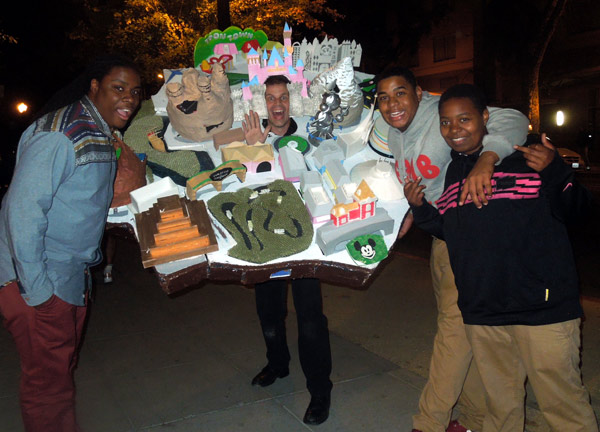
This was a medium-sized club, and the crowd loved, LOVED me.
The blonde drunk in the SWAT hat here tried to sit on the Disneyland costume, knocking some buildings off. The girl in the silver shirt was nice enough to put them back into place.
People were eagar to help me get around. As the club filled up, it got considerably more difficult.
Two guys bought me drinks. That's how much people loved this costume.
At around midnight, the costume contest started, so I made my way to the area next to the stage. The dance floor was absolutely jammed. It was impossible to move, taking 10 minutes to make my way to the side of the stage.
On stage, the crowd erupted for the Disneyland costume! I thought I had it won. No one else in the building could come close.
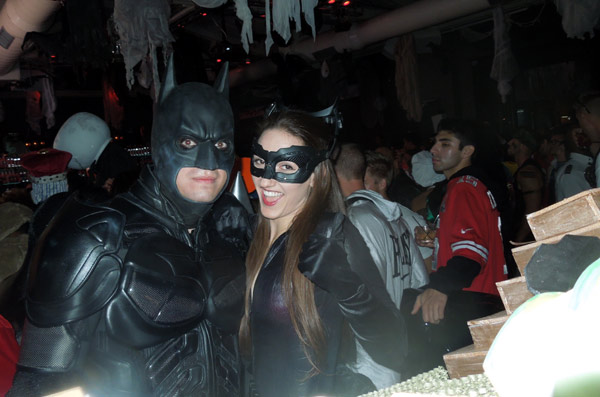
After my initial appearance onstage, Thunder Mountain and the haunted mansion flew off of the platform. Batman and Catwoman helped replace them onto the costume!
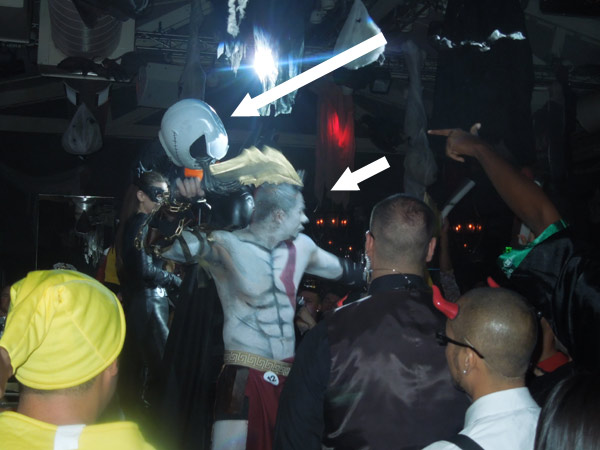
I'm not sure how, but I lost.
A Jack Skellington won first, a guy with God of War body makeup won second and that same couple dressed as Batman and Cat woman won third! I was out!
Jack Skellington was on stilts, but wasn't amazing or anything.
I think the guy in charge recognized me as the guy who won last year and didn't want me to win twice in a row. Also, the MC mistook my costume for "Sacramento". Ugh.
Sacramento has a river and a ziggurat, but it does not have a pink castle or a Matterhorn, making that a terrible guess.
I didn't win a thing! I was crushed. Can you believe it?
Summary
Contest results aside, I was really happy with the Disneyland costume. It actually came together as I had envisioned, I finished on time and the roller coasters worked all night. It was reasonably lightweight, and I didn't decapitate anyone while I was wearing it. That's a success in my eyes.
Also, I pretty much won the internet, and I love the internet.
Some of my costumes get chucked after the Halloween season, but I'm keeping this one forever, on ice in my underground cryogenic chamber.