

|
|
|
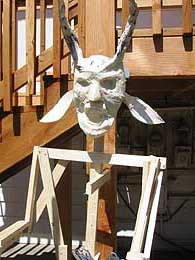
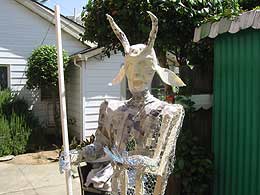
 I used large plastic yogurt containers for the goat ears. They were reinforced with hanger-wire. I used large plastic yogurt containers for the goat ears. They were reinforced with hanger-wire.
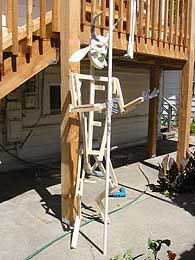
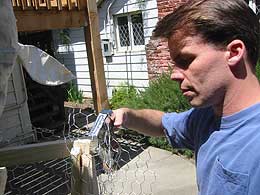
With the head finished, I attached it to the wooden skeleton and was ready to begin attaching chicken wire. As I have written before, chicken wire is annoying to work with because the cut ends invariably poke into my hands as I mold it into shape. Wearing gloves is possible, but if they are too bulky the fingers won't fit inside the mesh holes, which is even more annoying than getting poked. |
|
 I
unrolled a bit of the chicken wire and cut off a 4 foot "sheet".
I began wrapping this sheet into a rounded skin for satan, stapling
it into place. Nice, rounded curves are easy in one direction, such
as creating a long, tube-shaped arm, but bending that arm at the elbow
creates a mess of wrinkles in one spot and stretches the wire
unrealistically in another spot. I
unrolled a bit of the chicken wire and cut off a 4 foot "sheet".
I began wrapping this sheet into a rounded skin for satan, stapling
it into place. Nice, rounded curves are easy in one direction, such
as creating a long, tube-shaped arm, but bending that arm at the elbow
creates a mess of wrinkles in one spot and stretches the wire
unrealistically in another spot. |
|
In other words, simple curves are easy, but complex curves are...well, complex. I have learned to cut chicken wire sheet into smaller pieces when the surface I am trying to simulate gets intricate, such as on the neck or under his arms. |
|
 The
wire is hard to see (and photograph), so sometimes it isn't possible to
predict how the skin is going to look when it becomes a continuous
surface. A novice can also make the mistake of assuming the paper mache
will hide imperfections in the wire framework, when the paper will actually tend to enhance the visual impact of most errors. The
wire is hard to see (and photograph), so sometimes it isn't possible to
predict how the skin is going to look when it becomes a continuous
surface. A novice can also make the mistake of assuming the paper mache
will hide imperfections in the wire framework, when the paper will actually tend to enhance the visual impact of most errors. |
|
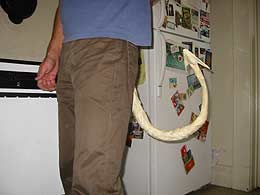 I
used a very thick (1/4 inch) wire from an old mattress to form a stiff, pointy
tail with a barb. I
used a very thick (1/4 inch) wire from an old mattress to form a stiff, pointy
tail with a barb.
I wrapped it with newspaper and lots of masking tape to get the tapering thickness correct. |
|
 I
use a staple gun with rounded "cable" staples, but I am sure any
kind of staples will work. They don't get pushed all the way into the
wood, so there is a little bit of "give" when the skin is being
attached. I
use a staple gun with rounded "cable" staples, but I am sure any
kind of staples will work. They don't get pushed all the way into the
wood, so there is a little bit of "give" when the skin is being
attached. |
|
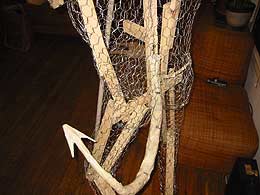
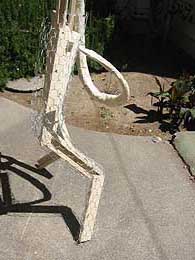 Here
the tail is attached. I attached the tail before I shaped his wire butt,
so I didn't realize how low it was. You'll see in later photos why this
was a problem. Here
the tail is attached. I attached the tail before I shaped his wire butt,
so I didn't realize how low it was. You'll see in later photos why this
was a problem. |
|
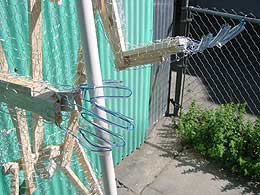 Here
is a close-up of the hands meeting the wrists. The wire fingers have clear
vinyl 3/4 inch tubing on them. Here
is a close-up of the hands meeting the wrists. The wire fingers have clear
vinyl 3/4 inch tubing on them. |
|
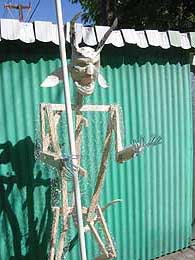
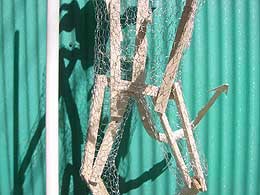 A
front view of the body with wire. A
front view of the body with wire. |
|
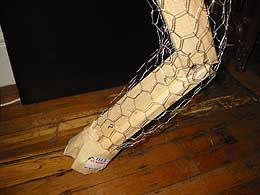 A
close-up of the goat-hoof foot. I used another plastic yogurt container to shape the smooth, rounded hoof. A
close-up of the goat-hoof foot. I used another plastic yogurt container to shape the smooth, rounded hoof. |
|
 Here
is the wire butt. I still hadn't spotted that the tail was too low. Loose, pointed ends of the chicken wire should be tucked back into your model. Here
is the wire butt. I still hadn't spotted that the tail was too low. Loose, pointed ends of the chicken wire should be tucked back into your model. |
|
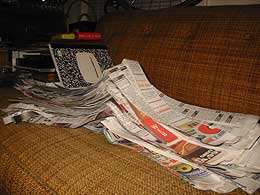
 With
the wire complete, I began ripping the newspaper into 2-inch
strips. Newspaper rips cleanly in one direction. Rip about four pages at a time. You could cut the paper with a
pair of scissors, but I think the slightly-ragged torn edges are better
for paper mache. With
the wire complete, I began ripping the newspaper into 2-inch
strips. Newspaper rips cleanly in one direction. Rip about four pages at a time. You could cut the paper with a
pair of scissors, but I think the slightly-ragged torn edges are better
for paper mache. |
|
 Here
is a big pile of paper strips. Ditch any creased,
wrinkled, too-thin or too-thick, uneven pieces and start production with a
nice pile of perfect newspaper strips. You will save yourself some
frustration. Here
is a big pile of paper strips. Ditch any creased,
wrinkled, too-thin or too-thick, uneven pieces and start production with a
nice pile of perfect newspaper strips. You will save yourself some
frustration. |
|
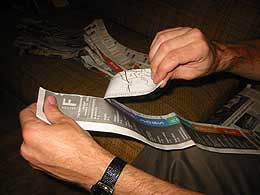
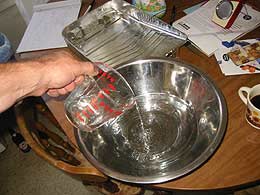 After
the paper was ripped, I prepared the paste. I use warm water and flour..regular old flour. I don't recommend adding anything else. The water doesn't even have to be warm, I just like it that way because my hands are going to be in it for the next hour. After
the paper was ripped, I prepared the paste. I use warm water and flour..regular old flour. I don't recommend adding anything else. The water doesn't even have to be warm, I just like it that way because my hands are going to be in it for the next hour.
Put the water into the bowl first, then add flour slowly. If you have a flour sifter, use it, but you don't really need one. |
|
 I
mixed up three batches of paste while I was working on Satan, each one was
about 5 cups of water and 3˝ cups of flour. I
mixed up three batches of paste while I was working on Satan, each one was
about 5 cups of water and 3˝ cups of flour. |
|
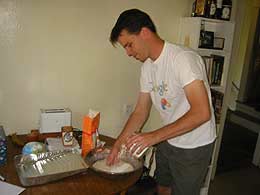
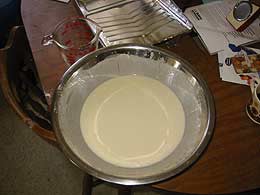 Mix
the flour into the water, mixing with one hand at least until most of the
lumps are gone. Mix
the flour into the water, mixing with one hand at least until most of the
lumps are gone.
Oh yeah, you might want to use the bathroom before you start paper-mache. I recommend working outside. The paste drips everywhere.
|
|
 I
dunk one strip at a time into the paste, then pull the strip up between
two fingers to squeeze most of the paste off. Then I smooth it onto the
wire frame. I
dunk one strip at a time into the paste, then pull the strip up between
two fingers to squeeze most of the paste off. Then I smooth it onto the
wire frame.
Wet paper strips have a hard time sticking to the slick chicken wire, so the first few strips tend to slide off. If you tuck the ends of these strips into the mesh of the chicken wire, they will usually stay put. Once there are a few strips of paper on the wire, they stick more easily. |
|
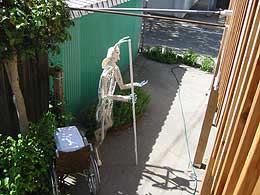 In
this photo you can see a wheelchair with an ice-chest on top of it. This
served as my work-bench, holding the paste-bowl and the newspaper right at
the height of my waist. The height is important. It can make the work a pleasure or a chore. In
this photo you can see a wheelchair with an ice-chest on top of it. This
served as my work-bench, holding the paste-bowl and the newspaper right at
the height of my waist. The height is important. It can make the work a pleasure or a chore.
I recommend using a wheelchair and an ice chest, but any bizarre combination of objects will do. |
|
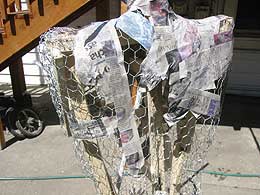
 One strip at a time, a layer of paper went onto the body, the head and the hands. One strip at a time, a layer of paper went onto the body, the head and the hands. |
|
| please continue to part 3 of paper mache Satan. | |
Other incredible stuff | Home | Contact Rob
Oct. 11th, 2002.