

|
|
|
 Last Christmas, my sister Sue asked me if I could create a large
paper-mache Satan for a video project she wanted to film. She described what she wanted as being about 6 feet tall.
Last Christmas, my sister Sue asked me if I could create a large
paper-mache Satan for a video project she wanted to film. She described what she wanted as being about 6 feet tall.
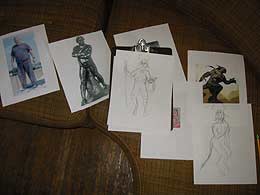
That sounded like a good project, and I was unemployed at the time, so I accepted. She even gave me enough cash to cover construction costs. (This usually gets me started on a project). The only excuse I have as to why it took about 5 months to get started was that we hadn't agreed to a design while she was in town. In any case, after some email motivation by Sue, I got to work. The first step was to gather some images online and to make a couple of sketches. |
|
 Making Satan with wings was a bit too involved, but I did want to include
goat-legs and a pitchfork. Unable to find the sketch I wanted, I
photographed myself and worked from that instead. Goat legs are
similar to human legs standing on tip-toe, except the feet are very long
and thin.. Making Satan with wings was a bit too involved, but I did want to include
goat-legs and a pitchfork. Unable to find the sketch I wanted, I
photographed myself and worked from that instead. Goat legs are
similar to human legs standing on tip-toe, except the feet are very long
and thin..
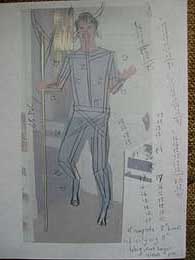
I sketched on top of a printout to estimate the number and lengths of pine boards that I would need to build a skeleton frame. You can almost see in this photo how the feet are modified and taper down to a hoof. |
|
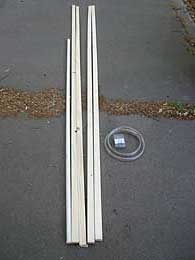 On
my first trip to buy supplies, I bought 5 10' 1x2" pine boards, some
screws and some clear plastic tubing for the hands. On
my first trip to buy supplies, I bought 5 10' 1x2" pine boards, some
screws and some clear plastic tubing for the hands. |
|
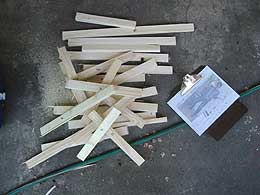 Next
I sawed the boards into pieces. There were 26 pine boards in my plan. Next
I sawed the boards into pieces. There were 26 pine boards in my plan. |
|
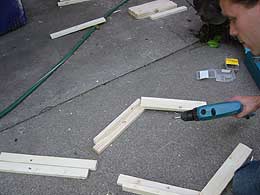 Next
I began screwing the boards together. Because none of the boards met at 90
degree angles, I put screws in wherever I could, at all sorts of wild
angles. To avoid splitting the small boards, I usually drilled pilot
holes. This was time consuming, but it went together pretty quickly. Next
I began screwing the boards together. Because none of the boards met at 90
degree angles, I put screws in wherever I could, at all sorts of wild
angles. To avoid splitting the small boards, I usually drilled pilot
holes. This was time consuming, but it went together pretty quickly. |
|
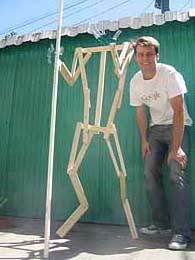
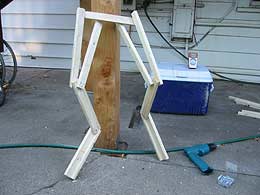 Before
long, the legs were together, standing on their own. Before
long, the legs were together, standing on their own. |
|
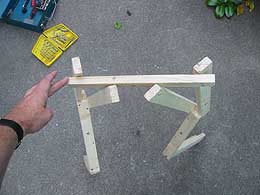 Top
view of the leg assembly. Top
view of the leg assembly. |
|
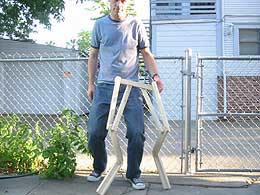 Checking
the height of the legs. When building a skeleton for a paper-mache
sculpture, you don't have to get it just right. Chicken wire is going to
be stapled onto the skeleton, so many errors can be hidden beneath that. Checking
the height of the legs. When building a skeleton for a paper-mache
sculpture, you don't have to get it just right. Chicken wire is going to
be stapled onto the skeleton, so many errors can be hidden beneath that. |
|
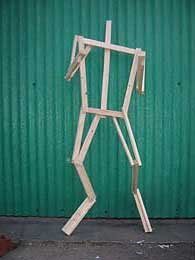 Once
the legs were standing, I could screw together the body, chest and arms.
In retrospect, these shoulders were too wide, but you can judge for
yourself when you see the finished product. Once
the legs were standing, I could screw together the body, chest and arms.
In retrospect, these shoulders were too wide, but you can judge for
yourself when you see the finished product. |
|
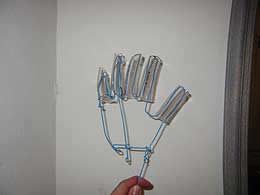 Chicken
wire is too crude a material to sculpt fingers and small details from, so
I used wire clothes hangers and clear plastic tubing to form the hands. Chicken
wire is too crude a material to sculpt fingers and small details from, so
I used wire clothes hangers and clear plastic tubing to form the hands.
I am worried that I won't be able to find wire hangers in the future. Maybe I'll be forced to use the drycleaner someday! |
|
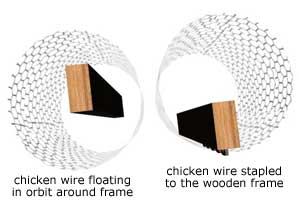  Satan
was looking pretty good from the front, but a side view revealed a lack of
depth. If there isn't anything to staple chicken wire to, the wire will
flop around, even after the paper mache is on there. Satan
was looking pretty good from the front, but a side view revealed a lack of
depth. If there isn't anything to staple chicken wire to, the wire will
flop around, even after the paper mache is on there.
In the illustration on the right, you can see how it is necessary to create a skeleton close to where the surface of the skin will be, rather than at the center of where the skin will be. This is somewhat counter-intuitive. |
|
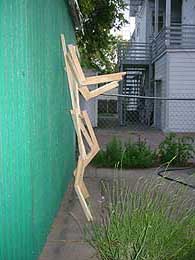
 I
added a little hook for a pitchfork to attach to the hand. The pitchfork
will add a third point of support, so Satan can stand on his own. I
added a little hook for a pitchfork to attach to the hand. The pitchfork
will add a third point of support, so Satan can stand on his own. |
|
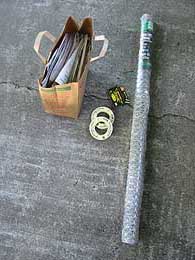 On
my second run to buy supplies, I bought about 10 square yards of one-inch
mesh chicken wire, staples and masking tape. I also raided the
newspaper recycling bin at the Sacramento Natural Foods Co-op. On
my second run to buy supplies, I bought about 10 square yards of one-inch
mesh chicken wire, staples and masking tape. I also raided the
newspaper recycling bin at the Sacramento Natural Foods Co-op. |
|
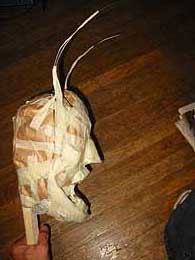 For
Satan's head, I filled a paper bag with crumpled newspaper and taped it
to a stick. I continued taping clumps of newspaper to the bag, forming his brow, nose, eye-sockets and
jaw. I made horn-supports with more clothes-hanger wire. I was working
from a photo of a man's head, and I also used a mirror to compare it with
the dimensions of my own head. For
Satan's head, I filled a paper bag with crumpled newspaper and taped it
to a stick. I continued taping clumps of newspaper to the bag, forming his brow, nose, eye-sockets and
jaw. I made horn-supports with more clothes-hanger wire. I was working
from a photo of a man's head, and I also used a mirror to compare it with
the dimensions of my own head.
|
|
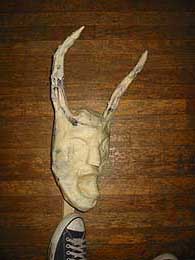 The great
big horns looked really nice. The face of a sculpture is always really important, so I spent a
while refining the look of it. The great
big horns looked really nice. The face of a sculpture is always really important, so I spent a
while refining the look of it.
I like to have a movie on in front of me while I am working on something like this. |
|
| please continue to part 2 of paper mache satan. | |
Other incredible stuff | Home | Contact Rob
Oct. 11th, 2002.